SSH
-
SHH(Secure Shell)用于加密两台计算机的通信,支持各种身份验证机制,主要用于保证远程登陆和远程通信的安全。SSH 的软件架构是CS模式,其有多种实现,主要用的是开源的OpenSSH
-
一般用 大写的 SSH 表示协议,小写的 ssh 表示客户端软件
登录服务器
$ ssh user@hostname
user是登录服务器的用户名,hostname是主机名(域名或者IP地址)
ssh 默认连接服务器的 22 端口,可以通过 -p参数进行端口指定
连接流程
-
ssh 连接服务器后,首先验证服务器是否为陌生地址,如果是第一次连接,会出现提醒是否确认连接
这里是否陌生是通过服务器 SSH公钥 的哈希值来判断的,每台 SSH服务器 都有一对密钥,ssh 会将本机连接过的服务器的公钥哈希值都存储在本机的
.ssh/known_hosts文件中,每次连接通过该文件判断是否为模式主机 -
确认连接后,ssh 会要求输入密码,之后就可以登录到目标服务器了
ssh客户端配置
用户的个人配置文件在~/.ssh/config
可以按照不同的服务器,列出各自的连接参数,以后就不需要每次登录都输入了,如:
Host remote
     HostName  xxxx.yyyy.com
     User      us
     Port      2222
remote 可以作为一个别名来代替原有的HostName,以后再登录该服务器,就可以:
ssh remote 等同于 ssh -p 2222 us@xxxx.yyyy.com
密钥登录
SSH默认使用密码登录,每次输密码较麻烦且不安全,所以在常用的工作机上可以设置密钥登录
密钥通过加密算法得到,一般是一长串数字,SSH采用非对称加密,和https的SSL加密过程有些类似
密钥登录过程
- 客户端通过
ssh-keygen命令生成自己的公钥和私钥,并将公钥上传到远程服务器 - 客户端向服务器发起SSH登录请求,服务器收到后发送一些随机数据给客户端
- 客户端使用私钥对数据进行签名,发回给服务器
- 服务器收到加密签名后使用对应的公钥解密判断是否一致
密钥生成和上传
- 生成密钥
OpenSSH提供了工具 ssh-keygen命令用来生成密钥,采用默认的rsa算法生成的密钥文件默认是~/.ssh/id_rsa(私钥)和~/.ssh/id_rsa.pub(公钥)
- 上传密钥
生成密钥之后,公钥要上传到服务器才能使用公钥登录
-
手动上传:
OpenSSH中的用户公钥保存在服务器的
~/.ssh/authorized_keys文件中,我们可以手动编辑这个文件,把公钥添加在这个文件的最后一行 -
自动上传
OpenSSH自带`ssh-copy-id`命令,可以自动将公钥拷贝到远程服务器的公钥文件中。在本地执行
ssh-copy-id -i key_file user@host就可以。其中-i表示指定公钥文件,即key_file。ssh-copy-id命令采用密码登录scp 命令
scp是 SSH 提供的一个客户端程序,用来在两台主机之间加密复制文件
scp是secure copy的缩写,相当于cp命令 + SSH,其底层是 SSH 协议,默认端口是 22,相当于先使用ssh命令登录远程主机,然后再执行拷贝操作
其主要用于以下三种复制: -
本地复制到远程
- 远程复制到本地
- 两个远程系统之间的复制
基本语法
scp语法类似于cp的语法: scp source destination
如:scp user@host: example.txt temp.txt 将远程主机主目录下的example.txt复制为本机当前目录的temp.txt,注意主机和文件之间要用冒号分隔
Vscode配置远程服务器免密连接
- 首先需要在vscode电脑上生成公钥私钥对:
ssh-keygen
从命令输出中查看到保存路径。
- id_rsa.pub是公钥,需要将其中内容复制到远程主机上:
vim ~/.ssh/authorized_keys #新建authorized_keys文件
#将公钥值复制进去
- 赋权限
chmod 700 /home/userName # 我是root用户,就跳过了这一步
chmod 700 ~/.ssh
chmod 600 ~/.ssh/authorized_keys
- 修改ssh配置文件
sudo vim /etc/ssh/sshd_config
#PubkeyAuthentication yes注释去掉,才可以使用公钥验证
- 重启sshd服务
systemctl restart sshd.service
- 在vscode的ssh配置文件中加入远程主机信息
Host 60.204.142.111
  HostName 60.204.142.111
  User root
  Port 23333
  IdentityFile C:\Users\hangx\.ssh\id_rsa
此时可以vscode免密远程登录到虚拟机。
Troubleshooting
-
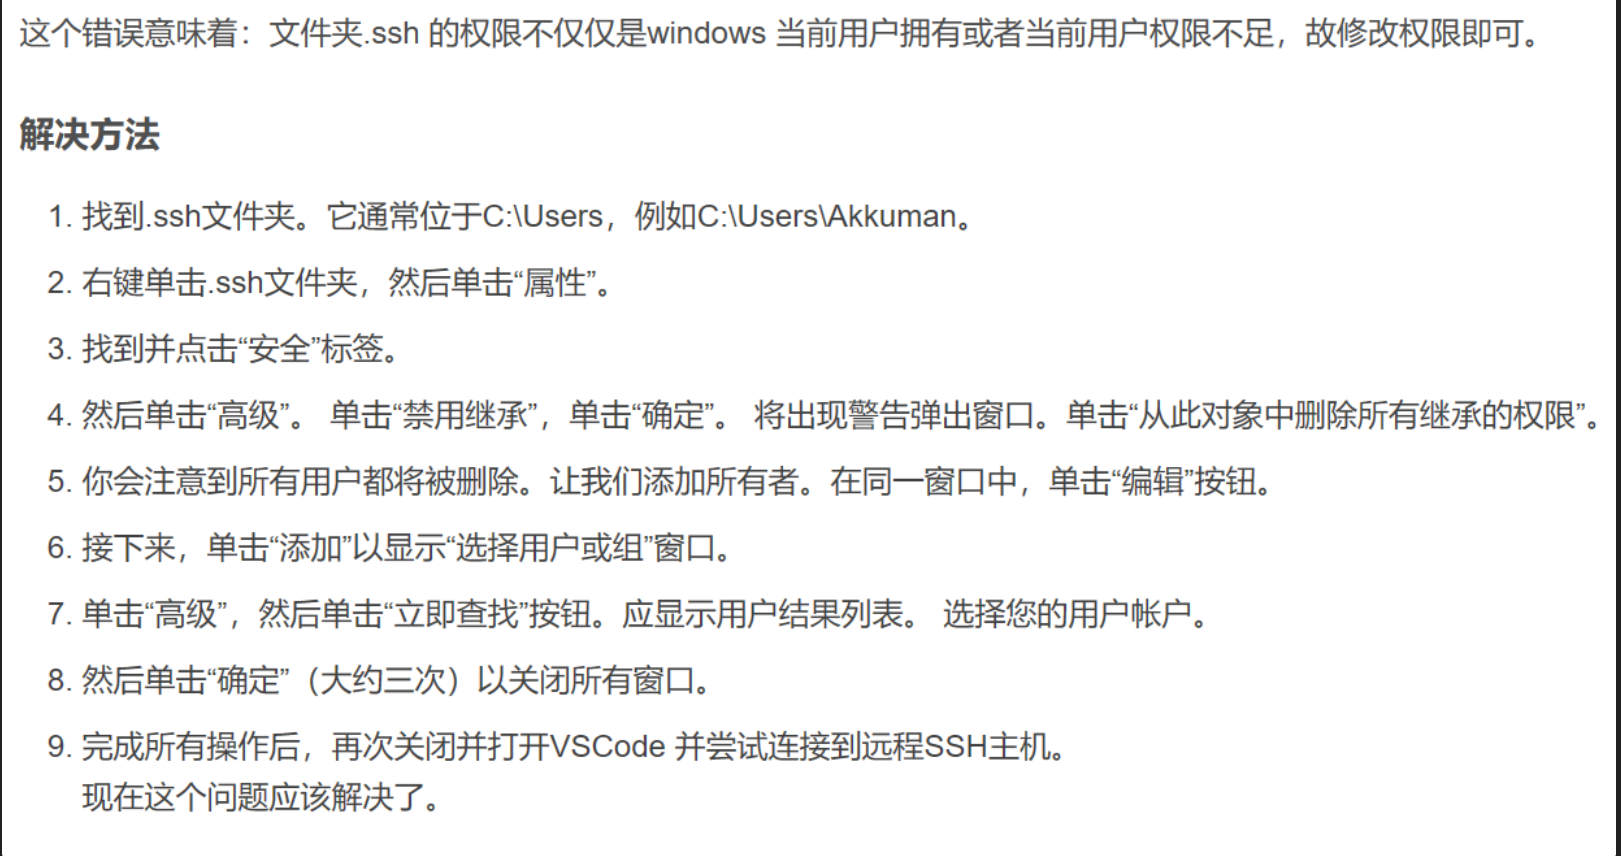
windows从公司账户切换到个人账户后,将公司账户配置文件里面的/.ssh/config文件拷贝到了个人账户的/.ssh中,在个人账户的vscode中尝试ssh连接时,报错:
Bad owner or permissions on C:\\Users\\xuhan/.ssh/config -
解决办法:
-
vscode ssh登录vmware虚拟机时报错:Address 192.168.. maps to localhost, but this does not map back to the address - POSSIBLE BREAK-IN ATTEMPT!
-
是因为DNS服务器把 192.168.x.x 的地址都反向解析成 localhost 。 解决的办法就是,编辑 ssh 客户端的 /etc/hosts 文件,把出问题的IP 地址和主机名加进去,就不会报这样的错了。
-
解决方案1:
- 给客户端主机配置hostname /etc/hosts,然后使用hostname ssh连接就可以了
-
解决方法2:
vim  /etc/ssh/ssh_config
#把GSSAPIAuthentication yes 改成 no
systemctl restart sshd
How to change ssh port on Azure
NOTE:CentOS 8 is used
1.Log in using PuTTY
2. Log into root user
sudo su
3. Modify the parameter within sshd_config
vi /etc/ssh/sshd_config
the default SSH port appears like this:
#Port 22
To change the SSH port to 2222, you will need to make the line appear like this:
Port 2222
3. Update Iptables and firewall
Firewalld.service is not activated on the newly created VM, so you need to start it firstly.
systemctl enable firewalld
systemctl start firewalld
Check the firewall service:
systemctl status firewalld
To allow the port in the firewall:
sudo firewall-cmd --permanent --zone=public --add-port=52019/tcp
sudo firewall-cmd --reload
You should see a ‘Success’ message after each of these commands.
To update iptables, please enter the following:
iptables -A INPUT -m state --state NEW -m tcp -p tcp --dport 2222 -j ACCEPT
you can double check that the firewall rule was added using:
sudo iptables-save | grep '2222'
And you should see:
-A IN_public_allow -p tcp -m tcp --dport 52019 -m conntrack --ctstate NEW -j ACCEPT
4. Modify the selinux configuration
Enforcing in selinux may lead to the failure of binding to the 2222 port, which will lead to the unsuccessfully restart of sshd.service. Enter:
getenforce
you may see:
enforcing
So close the selinux as following:
vi /etc/selinux/config
SELINUX=permissive
5. Restart sshd.service
systemctl restart sshd.service
6. Add inbound port rule on Azure Portal
Settings - Add inbound rule
7. Restart PuTTY using new port
exit
Log in with new port.
8. Delete the old security rule with 22 port
References:
Changing the SSH port for a RHEL Azure VM - Paul S. Randal (sqlskills.com)
How to Change the SSH Port on Dedicated and VPS | HostGator Support