AKS Workload Identity
Related Notes
Enable Workload Identity in AKS
AKS Workload Identity lets a Kubernetes service account use a federated Azure identity. See AKS Workload Identity deployment.
Prerequisites
- Install Azure CLI 2.47.0 or later.
如何安装 Azure CLI | Microsoft Learn
- Select Azure China, sign in, then select the subscription:
az cloud set -n AzureChinaCloud
az login
az account set --subscription <name-or-id>
Update Cluster
- Update cluster to enable oidc-issuer and workload-identity
az aks update -g <resource group name> -n <cluster name> --enable-oidc-issuer --enable-workload-identity
Get OIDC Issuer URL
- Get the OIDC issuer URL and save to environment variable
az aks show -g <resource group name> -n <cluster name> --query "oidcIssuerProfile.issuerUrl"
export AKS_OIDC_ISSUER="$(az aks show -g <resource group name> -n <cluster name> --query "oidcIssuerProfile.issuerUrl" -otsv)"
Create Managed Identity
- Create managed identity (using managed identity as example, can also use AAD application)
export SUBSCRIPTION_ID="$(az account show --query id --output tsv)"
export USER_ASSIGNED_IDENTITY_NAME="myIdentity"
export RG_NAME="myResourceGroup"
export LOCATION="chinanorth"
az identity create --name "${USER_ASSIGNED_IDENTITY_NAME}" --resource-group "${RG_NAME}" --location "${LOCATION}" --subscription "${SUBSCRIPTION_ID}"
export USER_ASSIGNED_CLIENT_ID="$(az identity show --name "${USER_ASSIGNED_IDENTITY_NAME}" --resource-group "${RG_NAME}" --query clientId -o tsv)"
Create Kubernetes Service Account
az aks get-credentials -g <resource group name> -n <cluster name>
export SERVICE_ACCOUNT_NAME="workload-identity-sa"
export SERVICE_ACCOUNT_NAMESPACE="my-namespace"
cat <<EOF | kubectl apply -f -
apiVersion: v1
kind: ServiceAccount
metadata:
  annotations:
    azure.workload.identity/client-id: "${USER_ASSIGNED_CLIENT_ID}"
  name: "${SERVICE_ACCOUNT_NAME}"
  namespace: "${SERVICE_ACCOUNT_NAMESPACE}"
EOF
Create Federated Identity Credential
export FEDERATED_CREDENTIAL_NAME="myFederatedCredential"
az identity federated-credential create \
  --name "${FEDERATED_CREDENTIAL_NAME}" \
  --identity-name "${USER_ASSIGNED_IDENTITY_NAME}" \
  --resource-group "${RG_NAME}" \
  --issuer "${AKS_OIDC_ISSUER}" \
  --subject "system:serviceaccount:${SERVICE_ACCOUNT_NAMESPACE}:${SERVICE_ACCOUNT_NAME}"
Lab: Pod Accessing Key Vault with Workload Identity
Set Environment
# environment variables for the Azure Key Vault resource
export KEYVAULT_NAME="hangwikv1"
export KEYVAULT_SECRET_NAME="hangsecret1"
export RESOURCE_GROUP="aksWI"
export LOCATION="chinanorth2"

# environment variables for the user-assigned managed identity
# [OPTIONAL] Only set this if you're using a user-assigned managed identity as part of this tutorial
export USER_ASSIGNED_IDENTITY_NAME="hangWI1"

# environment variables for the Kubernetes service account & federated identity credential
export SERVICE_ACCOUNT_NAMESPACE="default"
export SERVICE_ACCOUNT_NAME="hangwi1"
export SERVICE_ACCOUNT_ISSUER="https://chinanorth2.oic.prod-aks.azure.cn/xxxxxx/"
Create Key Vault
az keyvault create --resource-group "${RESOURCE_GROUP}" --location "${LOCATION}" --name "${KEYVAULT_NAME}"
export USER_ASSIGNED_IDENTITY_CLIENT_ID="$(az identity show --name "${USER_ASSIGNED_IDENTITY_NAME}" --resource-group "${RESOURCE_GROUP}" --query 'clientId' -otsv)"
export KEYVAULT_URL="$(az keyvault show -g ${RESOURCE_GROUP} -n ${KEYVAULT_NAME} --query properties.vaultUri -o tsv)"
Set Policy
az keyvault set-policy --name "${KEYVAULT_NAME}" \
  --secret-permissions get \
  --spn "${USER_ASSIGNED_IDENTITY_CLIENT_ID}"
Create Workload (a Pod)
cat <<EOF | kubectl apply -f -
apiVersion: v1
kind: Pod
metadata:
  name: quick-start
  namespace: ${SERVICE_ACCOUNT_NAMESPACE}
  labels:
    azure.workload.identity/use: "true"
spec:
  serviceAccountName: ${SERVICE_ACCOUNT_NAME}
  containers:
    - image: ghcr.io/azure/azure-workload-identity/msal-go
      name: oidc
      env:
      - name: KEYVAULT_URL
        value: ${KEYVAULT_URL}
      - name: SECRET_NAME
        value: ${KEYVAULT_SECRET_NAME}
  nodeSelector:
    kubernetes.io/os: linux
EOF
Lab: Obtain an Access Token in a Pod
cat > order-processor.yaml <<'EOF'
apiVersion: apps/v1
kind: Deployment
metadata:
  name: order-processor
  labels:
    app: order-processor
    azure.workload.identity/use: "true"
spec:
  selector:
    matchLabels:
      app: order-processor
  template:
    metadata:
      labels:
        app: order-processor
    spec:
      serviceAccountName: hangwi1
      containers:
      - name: order-processor
        image: ghcr.io/kedacore/sample-dotnet-worker-servicebus-queue:latest
        env:
        - name: KEDA_SERVICEBUS_AUTH_MODE
          value: WorkloadIdentity
        - name: KEDA_SERVICEBUS_HOST_NAME
          value: elksvcBus.servicebus.chinacloudapi.cn
        - name: KEDA_SERVICEBUS_QUEUE_NAME
          value: orders
EOF
- Get the Azure identity token mounted in the pod, decode at jwt.ms:
k exec -it order-processor-8649d8cbb8-mn6mg /bin/sh
cat /run/secrets/azure/tokens/azure-identity-token
Exchange Token
You can take the identity token and exchange it for an access token via Postman.
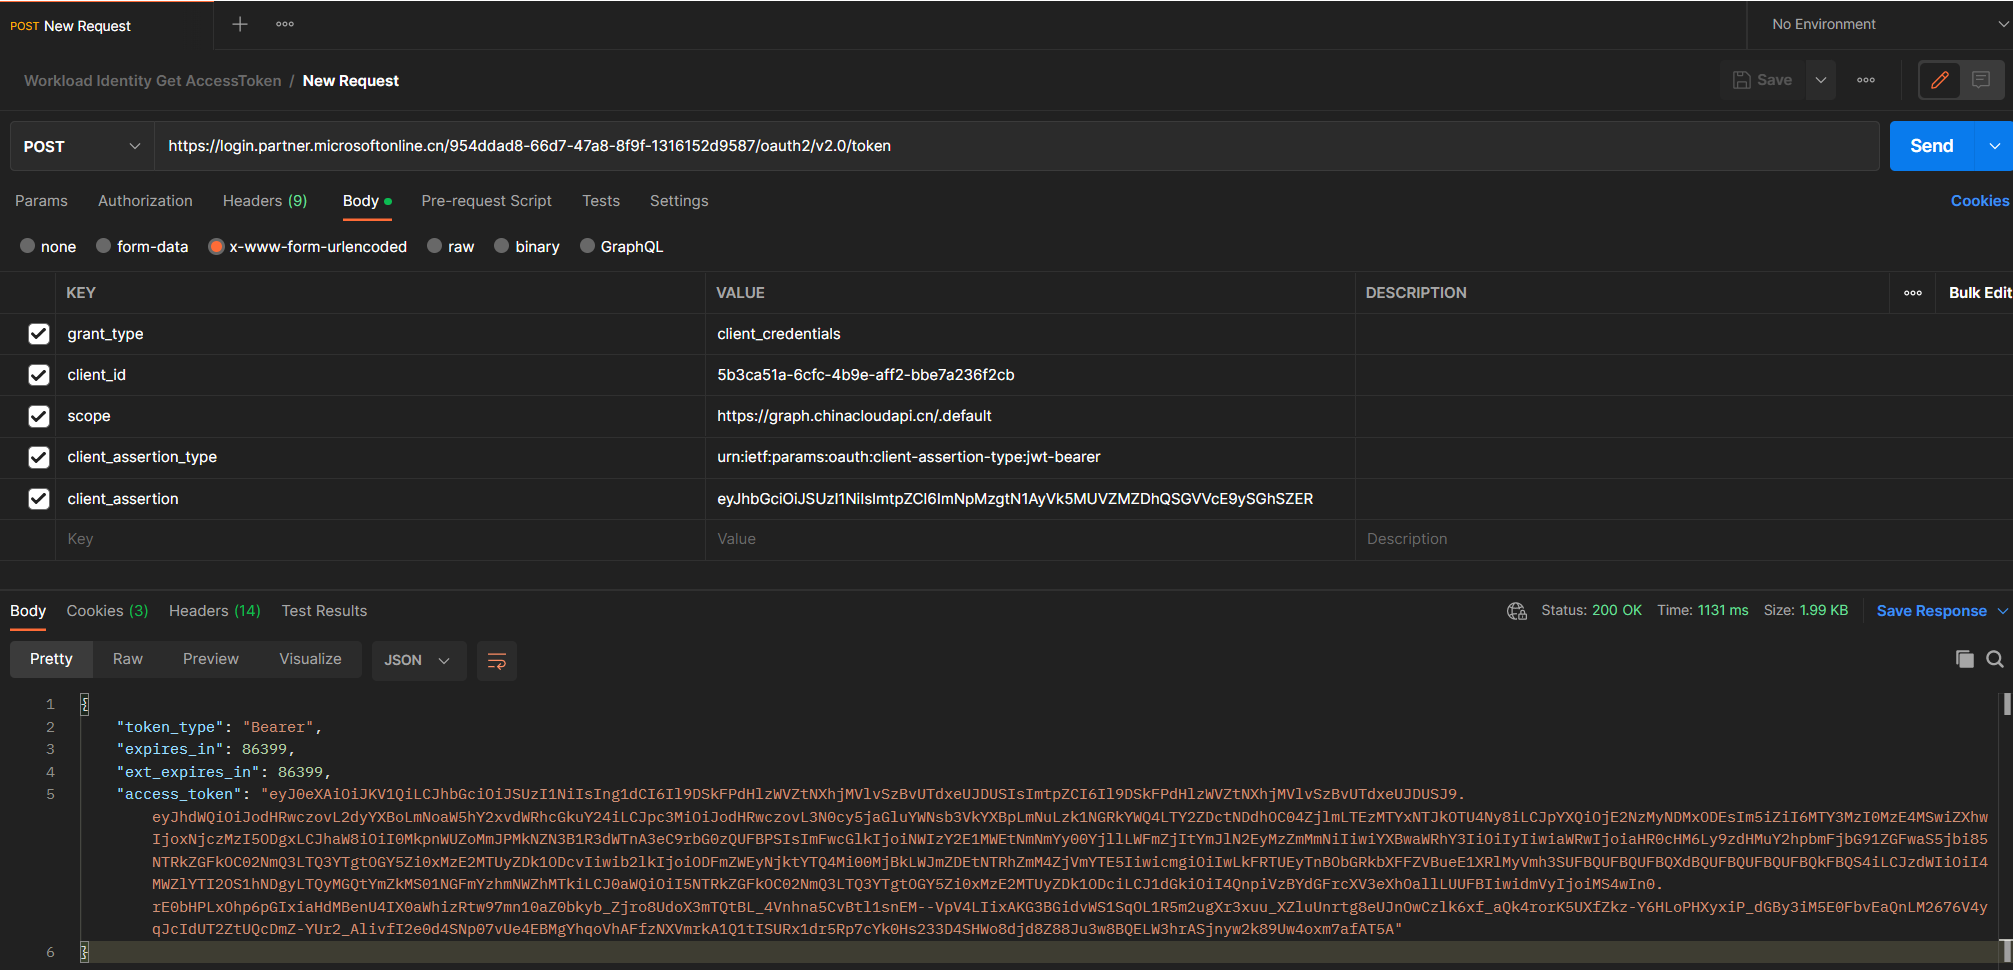
POST endpoint can be found in AAD - App registration - endpoints.
Warning
client_id uses underscores, not hyphens.
Lab: Obtain an Access Token Directly in a Pod
- Mount service account, the Azure access token is available at
cat /run/secrets/azure/tokens/azure-identity-token:
apiVersion: v1
kind: Pod
metadata:
  name: centos
  labels:
    azure.workload.identity/use: "true"
spec:
  serviceAccountName: hangwi1
  containers:
    - name: centos
      image: dockerhub.azk8s.cn/library/centos:latest
      command: ["/bin/sh"]
      args: ["-c", "while true; do echo hello; sleep 10;done"]
k exec -it centos-workload-identity -- /bin/bash
#查看token
cat /run/secrets/azure/tokens/azure-identity-token