Kubernetes 自动扩缩容实战:HPA、VPA 与 Scale-to-Zero
Kubernetes 的自动扩缩容不是单一控制器,而是由多个层级协同完成:HPA 调整 Pod 副本数,VPA 调整单个 Pod 的资源请求,KPA 面向 Knative 请求并发,Cluster Autoscaler 调整节点容量。本文先建立指标基础,再分别说明 HPA、Kubernetes 1.37 原生 Scale-to-Zero 与 VPA 的原理、部署和生产实践。
选型速览
- 流量增长,需要增加 Pod:使用 HPA。
- 单个 Pod 的 CPU/内存 requests 长期不合理:使用 VPA。
- Knative 服务按并发请求缩放:使用 KPA。
- Pod 因节点资源不足而 Pending,或节点长期空闲:使用 Cluster Autoscaler。
- 队列 Worker 空闲时需要缩到 0:Kubernetes 1.37+ 可使用原生 HPA 的
HPAScaleToZero;需要大量事件源连接器时仍可选择 KEDA。
一、自动扩缩容体系
| 组件 | 调整对象 | 主要信号 | 典型场景 |
|---|---|---|---|
| HPA | Deployment、StatefulSet 等工作负载的副本数 | CPU、内存、自定义指标、外部指标 | Web 服务、Worker 水平扩容 |
| VPA | Pod 中容器的 CPU/内存 requests | 历史资源使用量 | 资源规格校准、垂直扩缩容 |
| KPA | Knative Revision 的 Pod 副本数 | 并发请求数 | Knative 服务按请求缩放 |
| Cluster Autoscaler | 集群节点数 | Pending Pod 与节点利用情况 | 云上节点池扩缩容 |
HPA
Horizontal Pod Autoscaler(HPA)是水平 Pod 自动扩缩容控制器,通常通过工作负载的 scale 子资源调整 Deployment、StatefulSet 等对象的副本数。它可以使用 CPU、内存、Pod 自定义指标、Object 指标和 External 指标。
VPA
Vertical Pod Autoscaler(VPA)根据 Pod 的历史资源使用情况计算并设置容器的 CPU、内存 requests,使调度器能够把 Pod 放到资源合适的节点。它既能缩小过度申请,也能提高资源不足的 request;VPA 通常不会回写 Deployment 的 Pod template,而是在 Pod 创建或更新时作用于实际 Pod。
VPA 的价值
VPA 可以减少人工基准测试和长期手工调参,让 Pod requests 更贴近实际需求,提高节点利用率。生产环境应先观察推荐值,再决定是否自动应用。
KPA
Knative Pod Autoscaler(KPA)基于请求并发进行扩缩容,支持副本上下限,但不提供基于 CPU 的扩缩容。它适合 Knative Serving,也可以与 HPA 分场景使用。
Cluster Autoscaler
Cluster Autoscaler(CA)是独立的集群节点伸缩程序:当 Pod 因资源不足无法调度时,它通过 Cloud Provider 扩容节点;当节点长期利用率低且 Pod 可以安全迁移时,它缩减节点。项目地址:kubernetes/autoscaler。
节点通常不会被 CA 删除的情况包括:
- 节点上的 Pod 受 PodDisruptionBudget 限制;
- 节点上存在不允许驱逐的
kube-systemPod; - Pod 不是由 Deployment、ReplicaSet、Job、StatefulSet 等控制器创建;
- Pod 使用本地存储;
- Pod 驱逐后没有其他节点可以调度;
- 节点带有禁止缩容注解。
kubectl annotate node <nodename> cluster-autoscaler.kubernetes.io/scale-down-disabled=true
Cluster Autoscaler 支持的云厂商和平台包括 GCE/GKE、AWS、Azure、Alibaba Cloud、OpenStack Magnum、DigitalOcean、CloudStack、Exoscale、Packet、OVHcloud、Linode、Hetzner 和 Cluster API。
二、指标基础:Metrics Server 与 Metrics API
HPA 和 VPA 都依赖指标。Metrics Server 实现集群级 Resource Metrics API,向 kubectl top、HPA、VPA 和调度相关组件提供 CPU、内存等即时资源指标;它不负责持久化数据,也不应替代 Prometheus 等精确监控系统。
- Resource metrics:
metrics.k8s.io,通常由 Metrics Server 提供; - Custom metrics:
custom.metrics.k8s.io,通常由监控系统的 Adapter 提供; - External metrics:
external.metrics.k8s.io,用于队列深度、Kafka lag 等集群外需求信号。
验证 Metrics Server:
kubectl top nodes
kubectl top pods -A
Helm 安装 Metrics Server
- GitHub:kubernetes-sigs/metrics-server
- Chart:metrics-server Helm Chart
helm repo add metrics-server https://kubernetes-sigs.github.io/metrics-server/
helm repo update
helm pull metrics-server/metrics-server --version 3.12.2
测试环境若 kubelet 使用自签名 serving certificate,可以暂时配置:
args:
  - --kubelet-insecure-tls
helm upgrade --install metrics-server . -f values.yaml
生产安全边界
--kubelet-insecure-tls 会绕过 kubelet TLS 证书校验,只适合临时排障或受控测试环境。生产环境应让 kubelet serving certificate 由集群 CA 签发,并建立 CSR 自动审批或证书轮换流程。
kubeadm 集群抓取失败排障
VPA Chart 的 Metrics Server 子 Chart 或独立 Metrics Server 可能报错:
"Failed to scrape node" err="Get \"https://172.16.183.100:10250/metrics/resource\": dial tcp 172.16.183.100:10250: connect: no route to host" node="rm1"
先区分网络不可达与 TLS 校验失败:
- 检查 Metrics Server Pod 到节点
10250端口的路由、安全组和防火墙; - kubeadm 默认部署的 kubelet serving certificate 为自签名证书,外部服务无法建立受信 TLS;
- 临时方案是增加
--kubelet-insecure-tls; - 长期方案按 kubelet serving certificates 配置由 API Server CA 签发的证书。默认流程可能需要人工批准 CSR,并在证书过期后再次批准;也可引入经过评估的 CSR 自动批准工具。
相关讨论:metrics-server#196。
Manifest 安装记录
下面保留基于 Metrics Server v0.6.1 的完整部署记录。该清单包含 --kubelet-insecure-tls,部署到生产前应按目标版本更新镜像、参数和 TLS 方案。
# 可选:预先导入镜像
docker load -i registry.cn-hangzhou.aliyuncs.com/google_containers/metrics-server:v0.6.1

# kube-apiserver 启用聚合层路由
vim /etc/kubernetes/manifests/kube-apiserver.yaml
# 增加:
# - --enable-aggregator-routing=true

# 静态 Pod 清单变化会使 kube-apiserver 重建;在维护窗口操作
systemctl restart kubelet
--enable-aggregator-routing=true 使 API Server 通过 Service IP 路由到扩展 API Server。API Aggregation Layer 能在不修改 Kubernetes 核心 API 的情况下提供 Metrics API 等扩展 API。
apiVersion: v1
kind: ServiceAccount
metadata:
  labels:
    k8s-app: metrics-server
  name: metrics-server
  namespace: kube-system
---
apiVersion: rbac.authorization.k8s.io/v1
kind: ClusterRole
metadata:
  labels:
    k8s-app: metrics-server
    rbac.authorization.k8s.io/aggregate-to-admin: "true"
    rbac.authorization.k8s.io/aggregate-to-edit: "true"
    rbac.authorization.k8s.io/aggregate-to-view: "true"
  name: system:aggregated-metrics-reader
rules:
  - apiGroups: ["metrics.k8s.io"]
    resources: ["pods", "nodes"]
    verbs: ["get", "list", "watch"]
---
apiVersion: rbac.authorization.k8s.io/v1
kind: ClusterRole
metadata:
  labels:
    k8s-app: metrics-server
  name: system:metrics-server
rules:
  - apiGroups: [""]
    resources: ["nodes/metrics"]
    verbs: ["get"]
  - apiGroups: [""]
    resources: ["pods", "nodes"]
    verbs: ["get", "list", "watch"]
---
apiVersion: rbac.authorization.k8s.io/v1
kind: RoleBinding
metadata:
  labels:
    k8s-app: metrics-server
  name: metrics-server-auth-reader
  namespace: kube-system
roleRef:
  apiGroup: rbac.authorization.k8s.io
  kind: Role
  name: extension-apiserver-authentication-reader
subjects:
  - kind: ServiceAccount
    name: metrics-server
    namespace: kube-system
---
apiVersion: rbac.authorization.k8s.io/v1
kind: ClusterRoleBinding
metadata:
  labels:
    k8s-app: metrics-server
  name: metrics-server:system:auth-delegator
roleRef:
  apiGroup: rbac.authorization.k8s.io
  kind: ClusterRole
  name: system:auth-delegator
subjects:
  - kind: ServiceAccount
    name: metrics-server
    namespace: kube-system
---
apiVersion: rbac.authorization.k8s.io/v1
kind: ClusterRoleBinding
metadata:
  labels:
    k8s-app: metrics-server
  name: system:metrics-server
roleRef:
  apiGroup: rbac.authorization.k8s.io
  kind: ClusterRole
  name: system:metrics-server
subjects:
  - kind: ServiceAccount
    name: metrics-server
    namespace: kube-system
---
apiVersion: v1
kind: Service
metadata:
  labels:
    k8s-app: metrics-server
  name: metrics-server
  namespace: kube-system
spec:
  ports:
    - name: https
      port: 443
      protocol: TCP
      targetPort: https
  selector:
    k8s-app: metrics-server
---
apiVersion: apps/v1
kind: Deployment
metadata:
  labels:
    k8s-app: metrics-server
  name: metrics-server
  namespace: kube-system
spec:
  selector:
    matchLabels:
      k8s-app: metrics-server
  strategy:
    rollingUpdate:
      maxUnavailable: 0
  template:
    metadata:
      labels:
        k8s-app: metrics-server
    spec:
      containers:
        - args:
            - /metrics-server
            - --cert-dir=/tmp
            - --secure-port=4443
            - --kubelet-insecure-tls
            - --kubelet-preferred-address-types=InternalIP
            - --kubelet-use-node-status-port
            - --metric-resolution=15s
          image: registry.cn-hangzhou.aliyuncs.com/google_containers/metrics-server:v0.6.1
          imagePullPolicy: IfNotPresent
          livenessProbe:
            httpGet:
              path: /livez
              port: https
              scheme: HTTPS
            periodSeconds: 10
          name: metrics-server
          ports:
            - containerPort: 4443
              name: https
              protocol: TCP
          readinessProbe:
            httpGet:
              path: /readyz
              port: https
              scheme: HTTPS
            initialDelaySeconds: 20
            periodSeconds: 10
          resources:
            requests:
              cpu: 100m
              memory: 10Mi
          securityContext:
            allowPrivilegeEscalation: false
            readOnlyRootFilesystem: true
            runAsNonRoot: true
            runAsUser: 1000
          volumeMounts:
            - mountPath: /tmp
              name: tmp-dir
      nodeSelector:
        kubernetes.io/os: linux
      priorityClassName: system-cluster-critical
      serviceAccountName: metrics-server
      volumes:
        - emptyDir: {}
          name: tmp-dir
---
apiVersion: apiregistration.k8s.io/v1
kind: APIService
metadata:
  labels:
    k8s-app: metrics-server
  name: v1beta1.metrics.k8s.io
spec:
  group: metrics.k8s.io
  groupPriorityMinimum: 100
  insecureSkipTLSVerify: true
  service:
    name: metrics-server
    namespace: kube-system
  version: v1beta1
  versionPriority: 100
kubectl apply -f components.yaml
kubectl top nodes
kubectl top pods -n kube-system
三、HPA 原理与使用约束
HPA 是一个周期性控制循环,周期由 kube-controller-manager 的 --horizontal-pod-autoscaler-sync-period 控制,默认值为 15 秒。每个周期中,控制器读取 scaleTargetRef、选择目标 Pod、查询指标,再计算期望副本数。
最基本的计算公式是:
$$
desiredReplicas = \left\lceil currentReplicas \times \frac{currentMetricValue}{desiredMetricValue} \right\rceil
$$
使用 averageUtilization 时,CPU/内存利用率相对于容器 requests 计算;如果目标 Pod 的相关容器没有设置该资源的 request,指标利用率无法定义,HPA 不会基于该指标执行缩放。多指标场景会分别计算副本数,选择最大的建议值。
默认行为中,扩容没有稳定窗口,缩容稳定窗口为 300 秒。autoscaling/v2 可以通过 behavior.scaleUp 和 behavior.scaleDown 分别配置稳定窗口与缩放速率;这不是“任意方向五分钟内都不能再次扩缩容”。
HPA 前置条件
- Resource 指标需要 Metrics Server;Custom/External 指标需要对应 Adapter。
- 基于 CPU 或内存利用率时,Pod 必须配置对应 requests。
- 生产环境不要仅因内存持续上升就扩容;内存是不可压缩资源,持续增长还可能意味着泄漏,应同时排查应用。
四、HPA 实战
基于 CPU 扩缩 nginx
apiVersion: apps/v1
kind: Deployment
metadata:
  name: nginx-hpa
spec:
  selector:
    matchLabels:
      app: nginx
  replicas: 1
  template:
    metadata:
      labels:
        app: nginx
    spec:
      containers:
        - name: nginx
          image: nginx:1.9.1
          imagePullPolicy: IfNotPresent
          ports:
            - containerPort: 80
              name: http
              protocol: TCP
          resources:
            requests:
              cpu: 10m
              memory: 25Mi
            limits:
              cpu: 50m
              memory: 60Mi
---
apiVersion: v1
kind: Service
metadata:
  name: nginx
  labels:
    app: nginx
spec:
  selector:
    app: nginx
  type: NodePort
  ports:
    - name: http
      protocol: TCP
      port: 80
      targetPort: 80
kubectl apply -f deploy-nginx.yaml
kubectl autoscale deployment nginx-hpa --cpu-percent=10 --min=1 --max=10
kubectl get svc
while true; do wget -q -O- http://10.109.68.255 >/dev/null; done
--cpu-percent=10 表示目标平均 CPU 利用率为 request 的 10%。可用 kubectl top pod 查看当前 CPU,再与 request 对比。
基于内存扩缩 nginx
apiVersion: autoscaling/v2
kind: HorizontalPodAutoscaler
metadata:
  name: nginx-hpa
spec:
  minReplicas: 1
  maxReplicas: 10
  scaleTargetRef:
    apiVersion: apps/v1
    kind: Deployment
    name: nginx-hpa
  metrics:
    - type: Resource
      resource:
        name: memory
        target:
          type: Utilization
          averageUtilization: 60
kubectl apply -f hpa-mem.yaml
kubectl exec -it nginx-hpa-7f5d6fbfd9-s8wbh -- /bin/sh
dd if=/dev/zero of=/tmp/a
查看目标集群支持的 HPA 字段:
kubectl get hpa.v2.autoscaling -o yaml >hpa-current.yaml
kubectl explain hpa.spec --api-version=autoscaling/v2
PHP CPU 压测示例
参考:HorizontalPodAutoscaler 演练。
准备镜像:
FROM php:5-apache
ADD index.php /var/www/html/index.php
RUN chmod a+rx index.php
<?php
$x = 0.0001;
for ($i = 0; $i <= 1000000; $i++) {
    $x += sqrt($x);
}
echo "OK!";
?>
docker build -t k8s.gcr.io/hpa-example:v1 .
docker save -o hpa-example.tar.gz k8s.gcr.io/hpa-example:v1
scp hpa-example.tar.gz node1:/root/
docker load -i hpa-example.tar.gz
apiVersion: apps/v1
kind: Deployment
metadata:
  name: php-apache
spec:
  selector:
    matchLabels:
      run: php-apache
  replicas: 1
  template:
    metadata:
      labels:
        run: php-apache
    spec:
      containers:
        - name: php-apache
          image: k8s.gcr.io/hpa-example:v1
          imagePullPolicy: IfNotPresent
          ports:
            - containerPort: 80
          resources:
            limits:
              cpu: 500m
            requests:
              cpu: 200m
---
apiVersion: v1
kind: Service
metadata:
  name: php-apache
  labels:
    run: php-apache
spec:
  ports:
    - port: 80
  selector:
    run: php-apache
kubectl apply -f php-apache.yaml

# 维持 1~10 个副本,目标平均 CPU 为 request 的 50%,即 100m
kubectl autoscale deployment php-apache --cpu-percent=50 --min=1 --max=10
kubectl get hpa

# 启动压测容器并持续请求服务
kubectl run stress-test -it --image=busybox --image-pull-policy=IfNotPresent -- /bin/sh
while true; do wget -q -O- http://php-apache.default.svc.cluster.local; done
五、Kubernetes 1.37 原生 HPA Scale-to-Zero
版本与字段校验
Kubernetes 官方文档将 HPAScaleToZero 标为 1.37 起 Beta 且默认启用。它必须同时在 kube-apiserver 与 kube-controller-manager 启用;上线前仍应以目标集群版本、发行版设置和实际 API 校验结果为准。
队列消费者、CI Agent、批处理 Worker 等负载常常“忙时爆满、闲时无任务”。传统 Resource 指标依赖运行中的 Pod,副本为 0 时无法取得 CPU/内存利用率,因此不能用 Resource 指标从 0 拉起。Scale-to-Zero 的关键是改用与 Pod 数量无关的需求信号,例如队列深度、Kafka lag 或待处理任务数。
原理和硬性约束
minReplicas: 0只支持 Object/Custom 或 External 指标,不支持 CPU、内存等 Resource 指标;- HPA 中必须至少配置一个 Object 或 External 指标,否则 API Server 会拒绝对象;
- 指标必须在 Pod 为 0 时仍可读取,且能表达独立需求;
- 默认 300 秒缩容稳定窗口用于避免 0 与 N 之间抖动,扩容侧可以设为 0 以快速回弹;
- HPA 处于缩零状态时会记录
ScaledToZero=True条件,用来区分 HPA 主动缩零与人工把副本设为 0。
队列深度驱动的完整配置
# Kubernetes 1.37 中该特性为 Beta 且默认启用;若发行版显式管理门控,
# kube-apiserver 与 kube-controller-manager 都必须配置:
# --feature-gates=HPAScaleToZero=true
apiVersion: autoscaling/v2
kind: HorizontalPodAutoscaler
metadata:
  name: queue-worker
spec:
  scaleTargetRef:
    apiVersion: apps/v1
    kind: Deployment
    name: queue-worker
  minReplicas: 0
  maxReplicas: 20
  metrics:
    - type: External
      external:
        metric:
          name: queue_messages_visible
        target:
          type: AverageValue
          averageValue: "1"
  behavior:
    scaleDown:
      stabilizationWindowSeconds: 300
    scaleUp:
      stabilizationWindowSeconds: 0
      policies:
        - type: Percent
          value: 500
          periodSeconds: 15
指标目标值
原整理稿使用 type: Value、value: "0" 表达“队列为空即缩零”。实际 HPA 比率计算的目标值不能作为零分母使用,因此这里改为每副本处理 1 条消息的 AverageValue: "1"。队列指标为 0 时仍可得到期望副本 0;具体目标值应按单 Pod 吞吐量压测确定。
与 KEDA 的取舍
KEDA 提供 Kafka、RabbitMQ、AWS SQS 等大量事件源连接器,并通过 ScaledObject 封装指标暴露。Kubernetes 1.37 之后,若已经通过 Prometheus Adapter 稳定提供 Object/External 指标,原生 HPA 可以直接缩到 0;若需要省去指标适配、直接连接多种消息中间件,KEDA 仍更省事。
迁移期不要让 KEDA ScaledObject 和原生 HPA 同时管理同一个 Deployment。可以让原生 HPA 先管理影子 Deployment,观察一周后切换业务,再下线 KEDA。
冷启动和生产边界
- 从 0 到 1 包含调度、拉镜像、启动进程、建立连接和预热,第一批任务可能超时;
- 延迟敏感、同步、SLA 严格的负载建议保留
minReplicas: 1; - 异步队列、批处理、CI Agent、Webhook receiver 更适合缩到 0;
- 使用 DaemonSet 或节点池预拉镜像,并通过调度亲和让 Worker 落到有镜像缓存的节点;
readinessProbe通过后再接收任务,消息系统应提供重试和死信队列;- 指标源要高可用;指标不可达、HPA 无法决策,以及队列有积压但副本长时间为 0 都应告警;
- 传统“Pod 数为 0”告警要结合
ScaledToZero状态与指标源健康度判断,避免误报。
六个常见翻车点
- CPU/内存指标配
minReplicas: 0:API 拒绝;改用 Object/External 指标。 - 从 0 冷启动过慢:保留 1 个预热副本,或用消息重试、死信队列吸收延迟。
- 缩容稳定窗口太短:副本在 0 和 N 之间抖动;设置 300 秒以上并限制单步缩容幅度。
- 指标源故障:HPA 沿用旧值或拒绝缩放;监控 Adapter 与指标管线并设置保守兜底。
- Pod 未就绪就接任务:依赖尚未建立导致任务失败;配置 readinessProbe 并完成依赖预热。
- KEDA 与 HPA 双重控制:两个控制器争夺副本数;同一个工作负载只能有一个伸缩控制器。
从 KEDA 迁移检查清单
- 确认集群版本、
HPAScaleToZero状态和autoscaling/v2API; - 确认指标是 Object/External 类型而不是 CPU/内存;
- 确认 Adapter 暴露的指标名与 HPA 的
metric.name完全一致; - 设置
minReplicas: 0、缩容稳定窗口和快速扩容策略; - 用影子 Deployment 验证扩缩容、冷启动和消息可靠性;
- 切流稳定后删除旧 ScaledObject,避免双重控制。
六、VPA 原理、组件与推荐模式
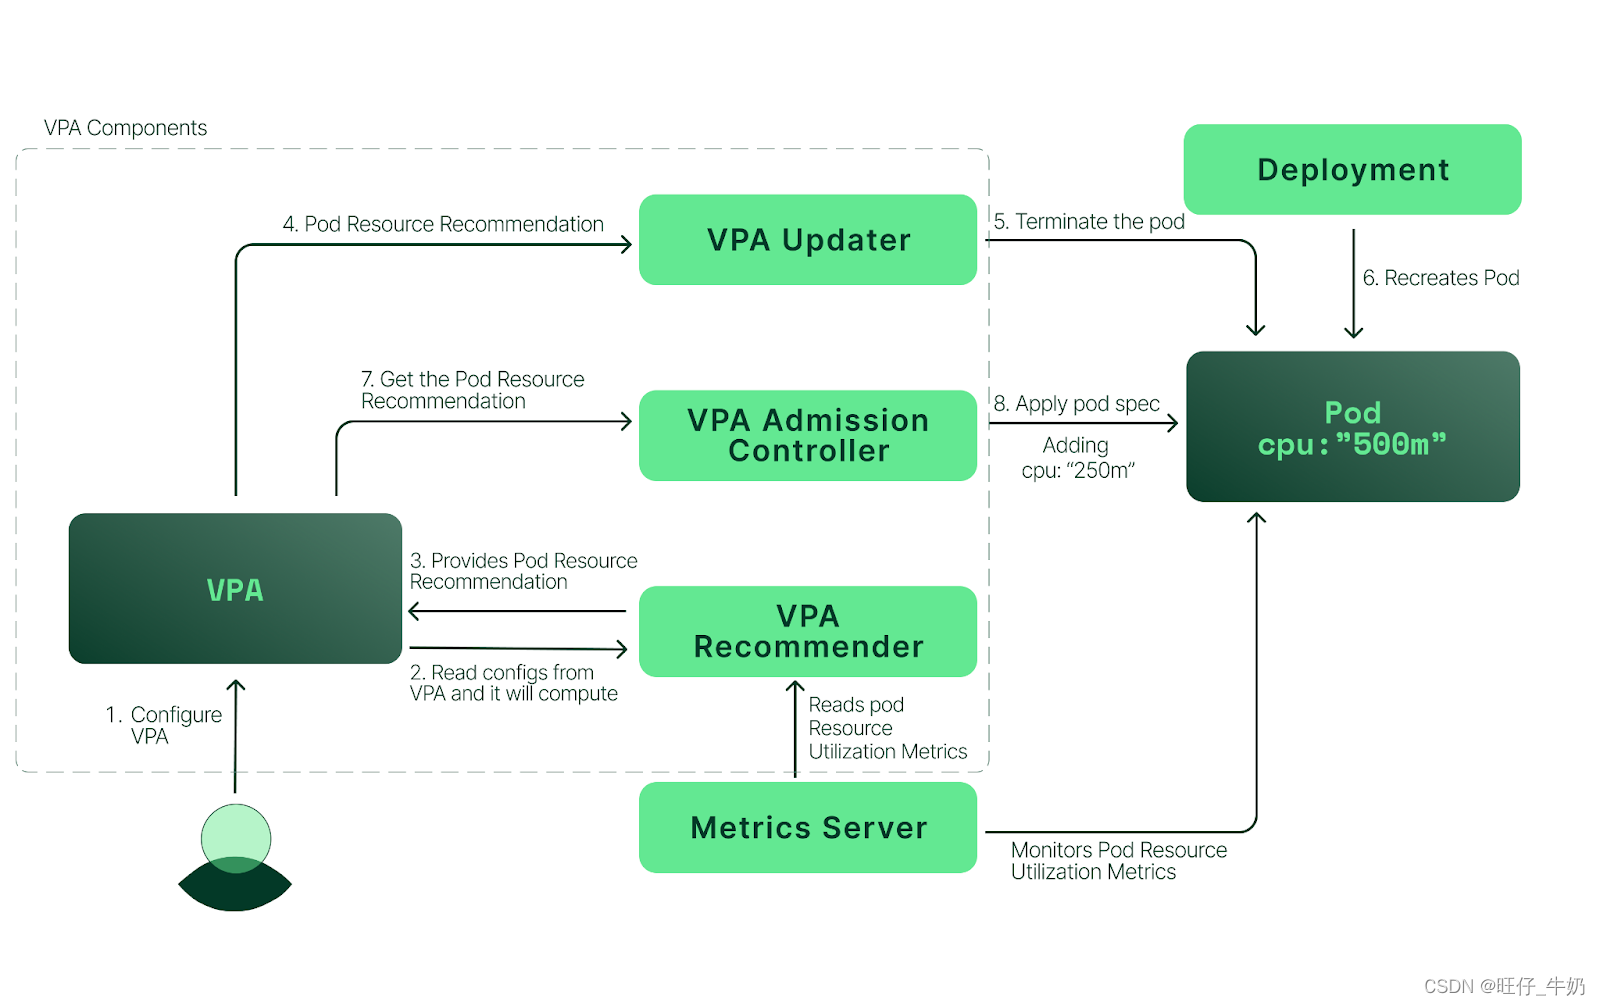
VPA 默认包含三个核心组件:
- Recommender:持续读取 Metrics API 和历史样本,为每个容器计算推荐 requests;
- Updater:判断运行中 Pod 是否需要更新,并按模式执行驱逐重建或原地调整;
- Admission Controller:在 Pod 创建时把推荐 requests 注入 Pod。
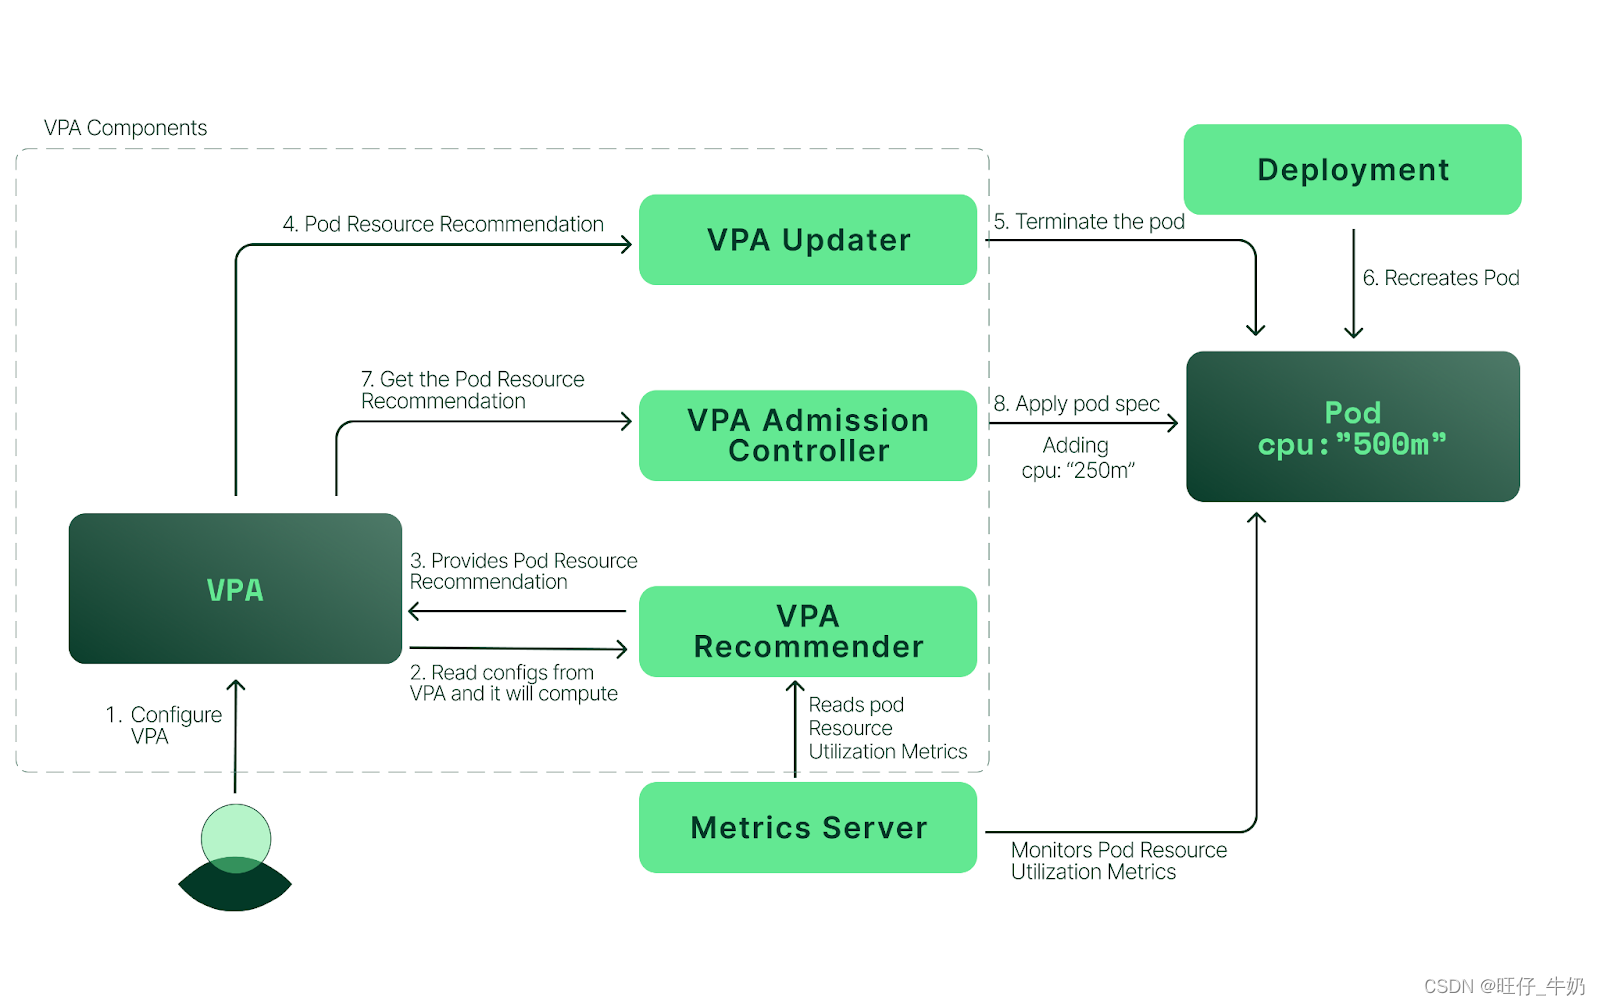
另一张组件关系图:
推荐算法
VPA Recommender 使用指数衰减直方图对历史 CPU/内存使用量建模:
- CPU 推荐通常关注使用量分布的高百分位(整理资料中为 P95),而不是简单平均值;
- Memory 推荐关注一段时间内的内存高水位;
- 整理资料记录的默认历史窗口为过去 8 天,可通过
--history-length调整; - 越近的数据权重越高,因此近期负载特征影响更大;
- 周期性业务峰值会进入推荐,刚上线且样本不足时应至少观察数天到数周。
updateMode
| Mode | 行为 | 使用建议 |
|---|---|---|
Off |
只生成推荐,不修改 Pod | 观察期、人工调整 requests |
Initial |
仅在 Pod 创建时注入推荐值 | 稳定服务、有状态服务 |
Recreate |
创建时注入;运行期需要更新时驱逐并重建 Pod | 能接受中断且需要显式重建的服务 |
InPlaceOrRecreate |
优先原地更新,失败时回退到重建 | 集群支持 In-place Pod resize 时使用 |
InPlace |
只尝试原地更新,不驱逐;失败后重试 | 需要避免驱逐,且相关特性门控已启用 |
Auto |
当前等价于优先更新机制;上游已标记弃用 | 新配置改用显式模式 |
版本差异
早期资料只列出 Off、Initial、Auto、Recreate 四种模式。当前上游文档已增加 InPlaceOrRecreate 与 InPlace,并将 Auto 标为 deprecated。使用前要核对 VPA 与 Kubernetes 版本、InPlacePodVerticalScaling 和 VPA InPlace 特性门控。
七、部署 VPA
VPA 可以使用上游安装脚本,也可以通过 Fairwinds Helm Chart 部署:
Fairwinds Helm Chart
helm repo add fairwinds-stable https://charts.fairwinds.com/stable
helm repo update fairwinds-stable
helm pull fairwinds-stable/vpa --version 4.7.1
整理资料中的 values.yaml 示例会启用 Recommender、关闭 Admission Controller,并安装 Metrics Server 子 Chart:
recommender:
  enabled: true

admissionController:
  enabled: false

metrics-server:
  enabled: true
  args:
    - --kubelet-insecure-tls
helm upgrade --install vpa fairwinds-stable/vpa \
  --namespace vpa \
  --create-namespace \
  --history-max 3 \
  --set admissionController.enabled=false \
  --set recommender.enabled=true
组件边界
关闭 Admission Controller 后,VPA 不能在新 Pod 创建时自动注入推荐值;如果目标是自动应用推荐,通常需要启用它。Chart 的 Metrics Server 子 Chart 字段也可能随版本变化,使用 helm show values fairwinds-stable/vpa --version 4.7.1 核对。
上游脚本安装记录
下面是旧环境的手工安装记录,包含 VPA 0.10.0 镜像与 OpenSSL 1.1.1k 编译步骤。它保留用于历史排障,不建议直接复制到当前生产系统;尤其是替换系统 OpenSSL 库会影响宿主机其他程序,应改在隔离镜像或维护窗口中验证。
docker load -i vpa-admission_0.10.0.tar.gz
docker load -i vpa-recommender_0.10.0.tar.gz
docker load -i vpa-updater_0.10.0.tar.gz

tar zxvf autoscaler-master.tar.gz
yum install gcc gcc-c++ -y
wget https://www.openssl.org/source/openssl-1.1.1k.tar.gz --no-check-certificate
tar zxf openssl-1.1.1k.tar.gz
cd openssl-1.1.1k
./config
make && make install

# 以下替换系统库的步骤具有破坏性,仅作为旧记录保留
mv /usr/local/bin/openssl /usr/local/bin/openssl.bak
mv apps/openssl /usr/local/bin
rm -rf /usr/lib64/libssl.so.1.1
ln -s /usr/local/lib64/libssl.so.1.1 /usr/lib64/libssl.so.1.1
rm -rf /usr/lib64/libcrypto.so.1.1
ln -s /usr/local/lib64/libcrypto.so.1.1 /usr/lib64/libcrypto.so.1.1

cd /root/autoscaler-master/vertical-pod-autoscaler/hack
./vpa-up.sh
kubectl get pods -n kube-system | grep vpa
验证 VPA:
kubectl --namespace=kube-system get pods | grep vpa
kubectl get customresourcedefinition | grep verticalpodautoscalers
kubectl --namespace=kube-system logs <vpa-pod-name> | grep -e '^E[0-9]\{4\}'
八、VPA 实战
nginx:先观察推荐值,再自动应用
kubectl create namespace vpa
apiVersion: apps/v1
kind: Deployment
metadata:
  name: nginx
  namespace: vpa
  labels:
    app: nginx
spec:
  replicas: 2
  selector:
    matchLabels:
      app: nginx
  template:
    metadata:
      labels:
        app: nginx
    spec:
      containers:
        - image: nginx
          name: nginx
          imagePullPolicy: IfNotPresent
          resources:
            requests:
              cpu: 200m
              memory: 300Mi
---
apiVersion: v1
kind: Service
metadata:
  name: nginx
  namespace: vpa
spec:
  selector:
    app: nginx
  type: NodePort
  ports:
    - port: 80
      targetPort: 80
apiVersion: autoscaling.k8s.io/v1
kind: VerticalPodAutoscaler
metadata:
  name: nginx-vpa
  namespace: vpa
spec:
  targetRef:
    apiVersion: apps/v1
    kind: Deployment
    name: nginx
  updatePolicy:
    updateMode: "Off"
  resourcePolicy:
    containerPolicies:
      - containerName: nginx
        minAllowed:
          cpu: 500m
          memory: 100Mi
        maxAllowed:
          cpu: "2"
          memory: 2600Mi
kubectl apply -f deploy-nginx.yaml
kubectl apply -f vpa-nginx.yaml
kubectl describe vpa nginx-vpa -n vpa
典型推荐结果包含 Lower Bound、Target、Uncapped Target 和 Upper Bound。示例中 Target 为 cpu: 500m、memory: 262144k(256Mi),说明 minAllowed 把 CPU 推荐下限限制在 500m。
Status:
  Conditions:
    Status: True
    Type: RecommendationProvided
  Recommendation:
    Container Recommendations:
      Container Name: nginx
      Lower Bound:
        Cpu: 500m
        Memory: 262144k
      Target:
        Cpu: 500m
        Memory: 262144k
      Uncapped Target:
        Cpu: 25m
        Memory: 262144k
      Upper Bound:
        Cpu: 576m
        Memory: 602928571
压测并观察推荐变化:
yum -y install httpd-tools
ab -c 100 -n 10000000 http://192.168.40.180:30327/
kubectl describe vpa nginx-vpa -n vpa
验证自动应用时,把旧示例中的 Auto 改成当前更明确的 Recreate:
spec:
  updatePolicy:
    updateMode: "Recreate"
kubectl apply -f vpa-nginx.yaml
kubectl get events -n vpa
Recreate 会在资源需要调整时通过 Eviction API 驱逐 Pod,再由控制器创建使用新 request 的 Pod。VPA 不会直接修改 Deployment template,因此 Git 中的声明值与实际 Pod request 可能不同。
hamster 官方压力示例
VPA Quick Start 提供了一个持续消耗约 500m CPU 的 Deployment。初始 request 为 100m,运行数分钟后可以观察推荐与 Pod request 的变化。
apiVersion: autoscaling.k8s.io/v1
kind: VerticalPodAutoscaler
metadata:
  name: hamster-vpa
spec:
  targetRef:
    apiVersion: apps/v1
    kind: Deployment
    name: hamster
  resourcePolicy:
    containerPolicies:
      - containerName: "*"
        minAllowed:
          cpu: 100m
          memory: 50Mi
        maxAllowed:
          cpu: "1"
          memory: 500Mi
        controlledResources: ["cpu", "memory"]
---
apiVersion: apps/v1
kind: Deployment
metadata:
  name: hamster
spec:
  selector:
    matchLabels:
      app: hamster
  replicas: 2
  template:
    metadata:
      labels:
        app: hamster
    spec:
      securityContext:
        runAsNonRoot: true
        runAsUser: 65534
      containers:
        - name: hamster
          image: registry.k8s.io/ubuntu-slim:0.14
          resources:
            requests:
              cpu: 100m
              memory: 50Mi
          command: ["/bin/sh"]
          args:
            - "-c"
            - "while true; do timeout 0.5s yes >/dev/null; sleep 0.5s; done"
安装 Goldilocks 后,它可以自动创建 VPA 对象,并在 Dashboard 中展示推荐值。
MySQL StatefulSet 渐进优化
初始资源:
resources:
  requests:
    memory: "2Gi"
    cpu: "1000m"
  limits:
    memory: "4Gi"
    cpu: "4000m"
先使用 Off 模式观察至少 24 小时:
apiVersion: autoscaling.k8s.io/v1
kind: VerticalPodAutoscaler
metadata:
  name: mysql-vpa
  namespace: production
spec:
  targetRef:
    apiVersion: apps/v1
    kind: StatefulSet
    name: mysql
  updatePolicy:
    updateMode: "Off"
kubectl describe vpa mysql-vpa -n production
# Target:      cpu: 450m, memory: 1.2Gi
# Upper Bound: cpu: 1500m, memory: 4Gi
# Lower Bound: cpu: 200m, memory: 900Mi
确认推荐合理后切换 Initial,再通过受控滚动重启让新 Pod 使用推荐值:
spec:
  updatePolicy:
    updateMode: "Initial"
kubectl rollout restart statefulset mysql -n production
该案例记录的效果为:单 Pod 节省 550m CPU 和 800Mi 内存;3 副本合计节省 1650m CPU 和 2.4Gi 内存,约等于一个 4C8G 节点的容量。该数据是特定负载样本,不能直接外推到其他 MySQL 实例。
九、HPA 与 VPA 协同及生产治理
VPA 和 HPA 不是绝对不能共存。真正的限制是:不要让 VPA 和 HPA 同时依据并控制同一 CPU/内存资源维度,否则 VPA 改变 request 会改变 HPA 利用率分母,两个控制器可能相互放大或抵消。
推荐组合:
- VPA
Off+ HPA:VPA 只提供建议,人工调整 requests; - VPA 管内存 + HPA 按 CPU 扩副本:分离控制维度;
- VPA + HPA 自定义/外部指标:HPA 不依赖 VPA 调整的 requests;
- KEDA 管事件扩缩容 + VPA
Off:用 VPA 辅助规格评估。
VPA 管内存,HPA 管 CPU
apiVersion: autoscaling.k8s.io/v1
kind: VerticalPodAutoscaler
metadata:
  name: my-app-vpa
spec:
  targetRef:
    apiVersion: apps/v1
    kind: Deployment
    name: my-app
  updatePolicy:
    updateMode: "Initial"
  resourcePolicy:
    containerPolicies:
      - containerName: my-app
        controlledResources: ["memory"]
        minAllowed:
          memory: 128Mi
        maxAllowed:
          memory: 4Gi
---
apiVersion: autoscaling/v2
kind: HorizontalPodAutoscaler
metadata:
  name: my-app-hpa
spec:
  scaleTargetRef:
    apiVersion: apps/v1
    kind: Deployment
    name: my-app
  minReplicas: 2
  maxReplicas: 20
  metrics:
    - type: Resource
      resource:
        name: cpu
        target:
          type: Utilization
          averageUtilization: 70
驱逐风险与 PDB
Recreate 以及旧 Auto 模式可能驱逐 Pod。VPA Updater 会通过 Eviction API 遵守 PDB,但 PDB 只能限制同时中断数量,不能保证新 Pod 一定可调度;VPA 推荐值也可能超过节点可分配资源。
apiVersion: policy/v1
kind: PodDisruptionBudget
metadata:
  name: my-app-pdb
spec:
  maxUnavailable: 1
  selector:
    matchLabels:
      app: my-app
还应设置合理的 minAllowed/maxAllowed,并确保 Cluster Autoscaler、节点最大规格和 ResourceQuota 能承接推荐值。
三个 VPA 常见陷阱
OOMKill 恶性循环
如果 VPA 缩小内存后发生 OOM,重启期间样本不足可能进一步压低推荐。minAllowed.memory 必须高于应用空闲基线,并保留安全余量:
resourcePolicy:
  containerPolicies:
    - containerName: app
      minAllowed:
        memory: 256Mi
      maxAllowed:
        memory: 2Gi
JVM 推荐偏差
JVM 的 RSS、堆已提交内存和实际使用量并不相同。minAllowed.memory 至少应覆盖 JVM -Xms 及非堆、线程栈和本地内存余量:
resourcePolicy:
  containerPolicies:
    - containerName: spring-app
      minAllowed:
        memory: 1Gi
        cpu: 500m
重建造成监控空洞
频繁重建容器会让 Prometheus 时序出现空洞并干扰告警。通过 minAllowed/maxAllowed 限制波动,核心服务优先使用 Initial 或经过版本验证的 In-place 模式。
自定义 Recommender
默认算法不满足需求时,可以部署自定义 Recommender,并使用 Prometheus 作为历史数据源:
apiVersion: apps/v1
kind: Deployment
metadata:
  name: custom-vpa-recommender
  namespace: kube-system
spec:
  replicas: 1
  template:
    spec:
      containers:
        - name: recommender
          image: my-registry/custom-recommender:v1
          args:
            - --recommender-name=custom
            - --storage=prometheus
            - --prometheus-address=http://prometheus:9090
            - --history-length=14d
            - --pod-recommendation-min-memory=64Mi
在 VPA 对象中选择该 Recommender:
spec:
  recommenders:
    - name: custom
监控
vpa_recommender_memory_usage
vpa_recommender_cpu_usage
vpa_recommender_recommendations_total
kubectl get vpa -A -o json | jq '.items[] | {
  name: .metadata.name,
  namespace: .metadata.namespace,
  target: .status.recommendation.containerRecommendations[0].target
}'
整理资料记录的 Grafana Dashboard ID:14588。
渐进式落地
| 阶段 | 操作 | 建议周期 |
|---|---|---|
| 观察期 | Off,收集推荐值 |
1~7 天或覆盖完整业务周期 |
| 灰度验证 | Initial,仅新 Pod 使用推荐值 |
1~2 周 |
| 生产推广 | 按中断容忍度选择 Initial、Recreate 或 In-place 模式,并设置上下限 |
持续 |
| 长期维护 | 定期检查推荐趋势、驱逐、Pending 与 OOM | 每月及大促前 |
三条落地原则:
- 始终设置
minAllowed/maxAllowed,防止推荐值极端化; - 有状态或核心服务优先
Initial,除非已经验证原地调整或重建的影响; - HPA 与 VPA 共存时分离指标和控制维度。
参考资料
- Kubernetes:Horizontal Pod Autoscaling
- Kubernetes Autoscaler:VPA Installation
- Kubernetes Autoscaler:VPA Quick Start
- Kubernetes Autoscaler:VPA API
- Kubernetes Autoscaler:VPA Known Limitations
- Fairwinds VPA Helm Chart
- Metrics Server
- Metrics Server v0.6.1
- GKE Cluster Autoscaler
- K8s VPA 垂直自动扩缩容:你真的会用吗?
- Kubernetes VPA 深度解析:从手动调参到自动资源配置的完整实战
- 告别 KEDA:K8s 1.37 原生 HPA Scale-to-Zero 落地实战