Helm部署OAuth2-Proxy
介绍
- 是一款对k8s应用做身份验证的反向代理。工作模式有两种:
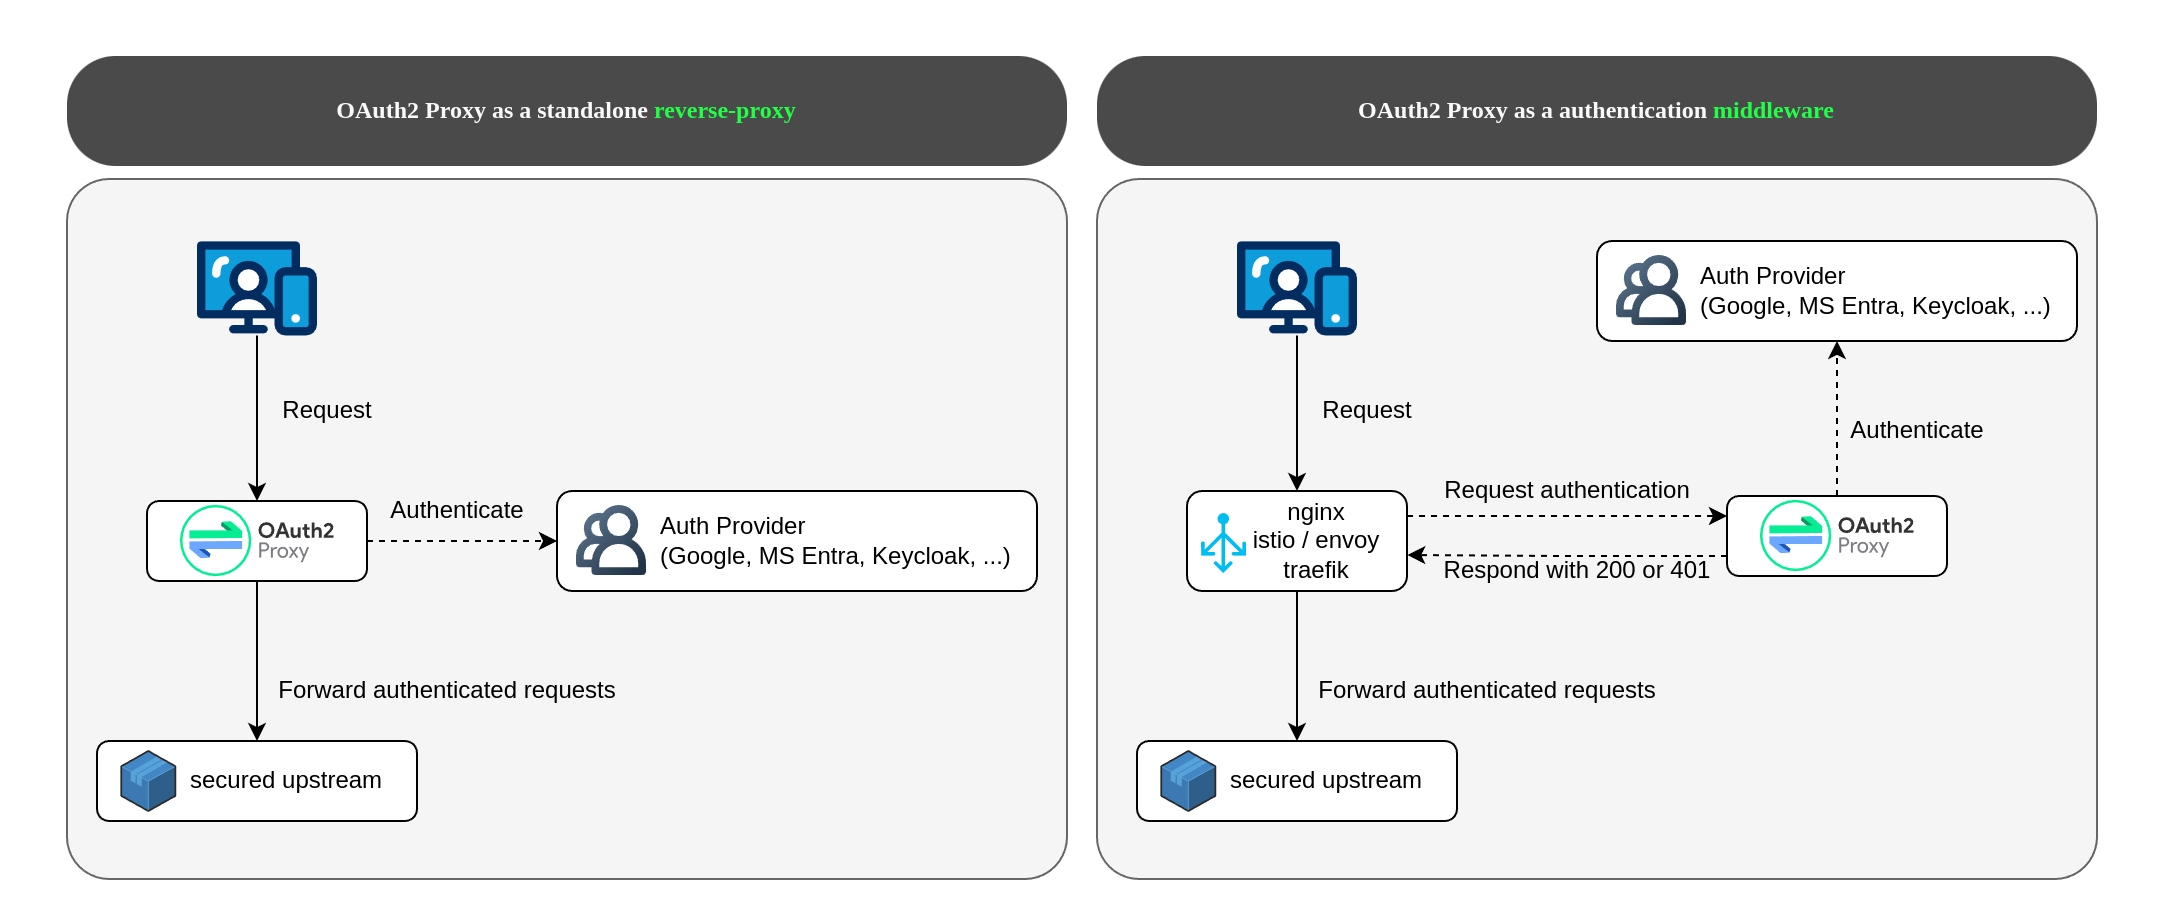
在我们的示例中,使用的是右边的middleware模式,作用于ingress-nginx。
-
github:oauth2-proxy/oauth2-proxy
-
releases page: OAuth2 Proxy Manifests Releases
-
artifact hub: oauth2-proxy helm chart
下载
helm repo add --force-update oauth2-proxy https://oauth2-proxy.github.io/manifests
helm repo update oauth2-proxy
helm pull oauth2-proxy/oauth2-proxy --version 7.7.1
配置oauth2proxy
创建redis password
oauth的sessionStorage选择使用redis,oauth helm chart会安装redis subchart。这里需要一个redis密码,保存到secret里。
export REDIS_PASSWD=$( openssl rand -base64 32 | head -c 32 | base64 )
kubectl -n oauth2-proxy create secret generic oauth2-proxy-redis --from-literal=redis-password=$REDIS_PASSWD
# 需要打上标签,后续安装helm的时候会被纳入到helm管理
kubectl label secrets oauth2-proxy-redis -n oauth2-proxy "app.kubernetes.io/managed-by"="Helm"
kubectl annotate secrets oauth2-proxy-redis -n oauth2-proxy "meta.helm.sh/release-name"="oauth2-proxy"
kubectl annotate secrets oauth2-proxy-redis -n oauth2-proxy "meta.helm.sh/release-namespace"="oauth2-proxy"
sessionStorage负责认证状态维护
sessionStorage:
  type: redis     # 使用 Redis 存储用户会话状态
redis:
  enabled: true   # 启用内置 Redis
这样的架构使得:
- Nginx 负责流量路由和认证检查
- OAuth2 Proxy 负责具体的 OAuth 认证流程
- Redis 负责会话状态存储
- 所有受保护的服务都能自动获得统一的身份认证
集成github认证
-
先去github生成一个OauthAPP:(Developer applications),复制
client id和client secret。 -
application name:
oauth2proxy-local -
Homepage URL:https://oauth2proxy.hanxux.local/
-
Authorization callback URL:https://oauth2proxy.hanxux.local/oauth2/callback
-
创建一个cookie secret
export COOKIE_SECRET=$( openssl rand -base64 32 | head -c 32 | base64 )
- oauth2proxy的values.yaml里面添加github认证相关参数
config:
  existingSecret: oauth2-proxy-creds
extraArgs:
  provider: github
  whitelist-domain: .hanxux.local
  cookie-domain: .hanxux.local
- 传入gitub oauth app的client id和secret
方法1-创建secret保存
- 创建k8s secret
export CLIENT_ID="Ov23liF0QvSRG51yPKq1"
export CLIENT_SECRET="xxx"
kubectl create namespace oauth2-proxy
kubectl -n oauth2-proxy create secret generic oauth2-proxy-creds --from-literal=cookie-secret=$COOKIE_SECRET --from-literal=client-id=$CLIENT_ID --from-literal=client-secret=$CLIENT_SECRET
方法2-直接写入values
- 注:上面创建secret的方式oauth2proxy没有读取到。遂采取直接把cookie_secret、client_id和client_secret三个参数直接写到values.yaml里面的方式
config:
  # Add config annotations
  annotations: {}
  # OAuth client ID
  clientID: "Ov23liF0QvSRG51yPKq1"
  # OAuth client secret
  clientSecret: "xxx"
  # Create a new secret with the following command
  # openssl rand -base64 32 | head -c 32 | base64
  # Use an existing secret for OAuth2 credentials (see secret.yaml for required fields)
  # Example:
  #existingSecret: oauth2-proxy-creds
  cookieSecret: "xxx"
  # The name of the cookie that oauth2-proxy will create
  # If left empty, it will default to the release name
  cookieName: ""
方法3-github secrets
- 上述方式不安全,会直接暴露secret。后续修改了secret加载方式,先存到github repository secrets里面,再从workflow中读取
export helmChartVersion=${{env.oauth2proxyVersion}}
export helmRepoName='oauth2-proxy'
export helmChartName='oauth2-proxy'
export REDIS_PASSWORD=$(kubectl get secret --namespace "oauth2-proxy" oauth2-proxy-redis --kubeconfig $KUBECONFIG -o jsonpath="{.data.redis-password}" | base64 -d)

helm upgrade -i oauth2-proxy -n oauth2-proxy \
oci://${{ env.harborURL }}/${{ env.harborProjectName }}/$helmRepoName/$helmChartName \
--version $helmChartVersion \
--history-max 5 \
-f ./base/external/oauth2-proxy/values.yaml \
--set config.clientID='${{ secrets.OAUTH2PROXY_CLIENT_ID}}' \
--set config.clientSecret='${{ secrets.OAUTH2PROXY_CLIENT_SECRET}}' \
--set config.cookieSecret='${{ secrets.OAUTH2PROXY_COOKIE_SECRET}}' \
--set global.redis.password=$REDIS_PASSWORD \
--insecure-skip-tls-verify \
--kubeconfig $KUBECONFIG
配置Https
-
首先部署出certmanager --> 创建clusterissuer --> 创建给oauth2proxy ingress https的secret --> helm values.yaml的ingress.tls部分配置secret、host
-
创建oauth2proxy的tls secret
tee certificate-oauth2proxy.yaml <<'EOF'
apiVersion: cert-manager.io/v1
kind: Certificate
metadata:
  name: cert-oauth2proxy
  namespace: oauth2-proxy
spec:
  secretName: oauth2proxy-tls-cert-secret
  privateKey:
    rotationPolicy: Always
  commonName: oauth2proxy.hanxux.local
  dnsNames:
    - oauth2proxy.hanxux.local
  usages:
    - digital signature
    - key encipherment
    - server auth
  issuerRef:
    name: selfsigned
    kind: ClusterIssuer
EOF
- oauth2proxy的values配置ingress tls
ingress:
  enabled: true
  ingressClassName: nginx-default
  hosts:
  - oauth2proxy.hanxux.local
  tls:
  - secretName: oauth2proxy-tls-cert-secret
    hosts:
    - oauth2proxy.hanxux.local
  path: /
  # Only used if API capabilities (networking.k8s.io/v1) allow it
  pathType: ImplementationSpecific
安装
helm upgrade -i oauth2-proxy -n oauth2-proxy --create-namespace . -f values.yaml
- 验证安装:
oauth2proxy.hanxux.local也要加到本机hosts文件中,https访问hostname即可看到oauthproxy的主页,有用github登录的提示。由于lab用的是自签证书,所以浏览器会报连接不安全。
回调URL
回调 URL 是 OAuth2 授权流程中,授权服务器(GitHub)在用户完成授权后,将用户重定向回去的目标地址。
使用回调URL的优点:
-
安全验证
-
GitHub 只会将授权码发送到预先注册的回调 URL
-
防止恶意应用窃取授权码
-
完成授权流程
-
OAuth2 Proxy 通过这个 URL 接收 GitHub 返回的授权码
-
没有这个回调,授权流程无法完成
-
状态管理
-
回调中包含
state参数,用于防止 CSRF 攻击 - OAuth2 Proxy 验证 state 确保请求的合法性
实际示例
使用的是 ingress-nginx 的外部认证功能来集成 OAuth2 Proxy。以访问jenkins
sequenceDiagram
    participant User as 用户浏览器
    participant IngressNginx as Ingress-Nginx Controller
    participant OAuth2 as OAuth2 Proxy
    participant GitHub as GitHub OAuth
    participant Jenkins as Jenkins Pod

    Note over User,Jenkins: 1. 初始访问
    User->>IngressNginx: GET https://jenkins.hanxux.local

    Note over IngressNginx,OAuth2: 2. Nginx 外部认证检查
    IngressNginx->>OAuth2: auth_request to https://oauth2proxy.hanxux.local/oauth2/auth
    OAuth2->>IngressNginx: 401 Unauthorized (no valid session)

    Note over IngressNginx,User: 3. 重定向到认证
    IngressNginx->>User: 302 Redirect to https://oauth2proxy.hanxux.local/oauth2/start?rd=https://jenkins.hanxux.local

    Note over User,GitHub: 4. OAuth2 授权流程开始
    User->>OAuth2: GET /oauth2/start?rd=...
    OAuth2->>User: 302 Redirect to GitHub OAuth

    User->>GitHub: GET /login/oauth/authorize?client_id=...&redirect_uri=https://oauth2proxy.hanxux.local/oauth2/callback

    Note over User,GitHub: 5. 用户在 GitHub 授权
    GitHub->>User: 显示授权页面
    User->>GitHub: 用户点击"授权"

    Note over GitHub,OAuth2: 6. GitHub 回调
    GitHub->>User: 302 Redirect to https://oauth2proxy.hanxux.local/oauth2/callback?code=...&state=...
    User->>OAuth2: GET /oauth2/callback?code=...

    Note over OAuth2,GitHub: 7. 交换访问令牌
    OAuth2->>GitHub: POST /login/oauth/access_token (exchange code for token)
    GitHub->>OAuth2: 返回 access_token

    OAuth2->>GitHub: GET /user (获取用户信息)
    GitHub->>OAuth2: 返回用户信息

    Note over OAuth2,User: 8. 设置认证会话
    OAuth2->>User: 设置认证 cookie + 302 Redirect to https://jenkins.hanxux.local

    Note over User,Jenkins: 9. 重新访问原始资源
    User->>IngressNginx: GET https://jenkins.hanxux.local (with auth cookie)

    Note over IngressNginx,OAuth2: 10. 再次进行外部认证
    IngressNginx->>OAuth2: auth_request to https://oauth2proxy.hanxux.local/oauth2/auth (with cookie)
    OAuth2->>IngressNginx: 200 OK + X-Auth-Request-User headers

    Note over IngressNginx,Jenkins: 11. 转发到后端服务
    IngressNginx->>Jenkins: GET / (with user headers)
    Jenkins->>IngressNginx: 返回 Jenkins 页面
    IngressNginx->>User: 返回 Jenkins 页面
OAuth2 Proxy 的作用:
从流程可以看出,OAuth2 Proxy 在这里扮演两个关键角色:
- 认证端点 (
/oauth2/auth): - Nginx 每次请求都会调用这个端点检查用户是否已认证
-
返回 200 表示已认证,401 表示未认证
-
认证流程处理器:
/oauth2/start: 开始 OAuth 流程/oauth2/callback: 处理 GitHub 回调
使用oauth2proxy保护其他app
- 在其他应用的ingress中添加annotations,详细说明参考ingress官网:OAuth External Auth
- 这两个annotations会将请求redirect到oauth2proxy,由oauth2proxy将请求转发到配置的3rd party认证endpoint (github)
annotations:
  nginx.ingress.kubernetes.io/auth-url: "http://oauth2-proxy.oauth2-proxy.svc.cluster.local/oauth2/auth"
  nginx.ingress.kubernetes.io/auth-signin: "https://oauth2proxy.hanxux.local/oauth2/start?rd=https%3A%2F%2F<host>.hanxux.local"