Istio基础
基本介绍
Github地址:istio/istio
- 详解文章:Istio详解 - 掘金
作用
Istio是一个开源的服务网格(Service Mesh),为Kubernetes和其他平台上的微服务架构提供了一种统一的、灵活的网络通信和管理方式。具有服务发现、负载均衡、流量管理、故障恢复和安全性等功能。
以下是Istio的一些基本特性:
- 代理注入:Istio使用Envoy作为其数据面代理,通过注入Envoy代理到每个微服务的Pod中,实现对流量的控制和管理。这种代理注入的方式无需修改应用代码,提供了一种非侵入式的部署方式。(部署好istio,会自动在创建的pod里面注入一个sidecar/envoy容器)
- 服务发现:Istio通过在代理中集成服务注册和发现机制,实现对微服务实例的自动发现和路由。它能够动态地将流量转发到可用的服务实例,并支持多种服务发现的机制
- 负载均衡:Istio提供了丰富的负载均衡策略,可以根据不同的需求进行流量的分发和负载均衡,包括轮询、加权轮询、故障感知等。
- 流量管理:Istio可以实现对流量的灵活管理和控制,支持流量切分、A/B测试、金丝雀发布等高级流量管理功能。它可以帮助开发人员更好地控制和管理微服务架构中的流量。
- 故障恢复:Istio提供了故障恢复机制,包括超时控制、重试、断路器和熔断等。它能够自动检测和处理微服务中的故障,并提供弹性和可靠性。
- 安全性:Istio提供了丰富的安全功能,包括流量加密、身份认证和授权、访问控制等。它可以通过自动注入代理,对服务间的通信进行加密和验证,提供了更高层次的安全保障。
流量管理
- 熔断
- 熔断是一种故障保护机制,用于在服务之间的通信中防止故障扩散,并提供更好的容错能力。在微服务架构中,一个应用通常由许多小型的、相互协作的服务组成。当某个服务发生故障或变得不可用时,如果不采取措施,可能会导致连锁反应,影响到整个系统的可用性。熔断机制旨在解决这个问题,其核心思想是在服务之间设置阈值和超时时间,并对请求进行监控。当服务的错误率或响应时间超过预设的阈值时,熔断器会打开,拒绝向该服务发送更多请求,并快速失败返回错误,而不是等待超时。
- 应用场景
- 快速失败返回: 当目标服务不可用时,不再尝试等待请求超时,而是快速返回错误,从而避免资源浪费和潜在的长时间等待。
- 故障隔离: 熔断机制阻止故障扩散,使问题局限在出现故障的服务,而不会影响到整个应用程序。
- 恢复机制: 熔断器会定期尝试发起一些请求到目标服务,以检查其是否已经恢复。如果服务恢复正常,则熔断器会逐渐关闭,允许流量再次流向目标服务。
- 自动重试: 一旦目标服务恢复,熔断器会逐渐允许一部分流量通过,如果没有再次出现问题,会逐渐恢复到正常状态,否则继续保持熔断状态。
-
在高并发情况下,如果请求数量达到一定极限(可以自己设置阈值),超出了设置的阈值,断路器会自动开启服务保护功能,通过服务降级的方式返回一个友好的提示给客户端。假设当10个请求中,有10%失败时,熔断器就会打开,此时再调用此服务,将会直接返回失败,不再调远程服务。直到10s之后,重新检测该触发条件,判断是否把熔断器关闭或者继续打开。
-
超时
-
在 Kubernetes(K8s)集群中结合 Istio,可以使用 Istio 的流量管理功能来控制服务之间的请求超时。超时是指在一定时间内,如果某个请求没有得到及时响应,就会被认为是超时。通过设置请求超时时间,可以对服务之间的通信进行控制,确保请求在合理的时间内得到响应,避免请求无限期地等待导致资源浪费或影响整体系统的响应性能。
Istio 的超时控制允许你为每个服务之间的请求设置最大的等待时间。当某个请求在指定的超时时间内没有得到响应时,Istio 会终止该请求并返回一个错误响应给客户端。这样可以防止请求在后端服务长时间等待,从而避免请求积压,同时提高系统的稳定性和可用性。
-
重试
- 重试机制就是如果调用服务失败,Envoy 代理尝试连接服务的最大次数。而默认情况下,Envoy 代理在失败后并不会尝试重新连接服务。
istio架构
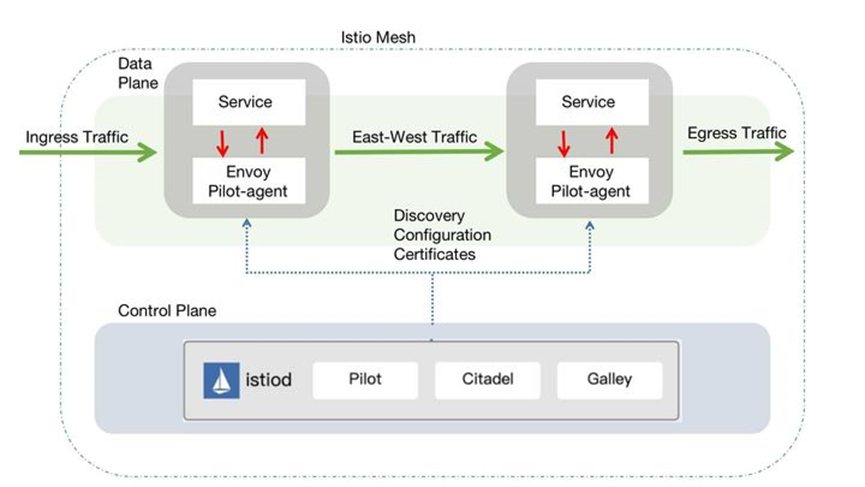
- 数据平面由一组以Sidecar方式部署的智能代理容器组成。这些代理承载并控制微服务之间的所有网络通信,管理入口和出口流量,类似于一线员工。 Sidecar 一般和业务容器运行在一个pod里,来劫持业务应用容器的流量,并接受控制面组件的控制,同时会向控制面输出日志、跟踪及监控数据。
-
控制平面负责管理和配置代理来路由流量。
-
istio1.5+中使用了一个全新的部署模式,重建了控制平面,将原有的多个组件整合为一个单体结构istiod,这个组件是控制平面的核心,管理Istio的所有功能,主要包括Pilot、Mixer、Citadel等服务组件。
istio组件
Pilot
-
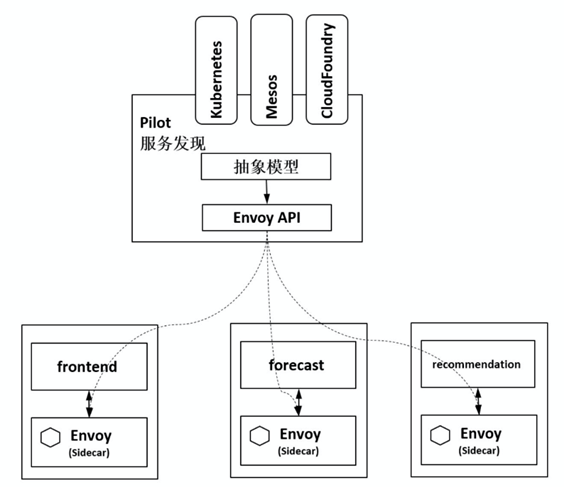
Pilot 是 Istio 控制平面的组件,在istio系统中,Pilot 完成以下任务:它从服务注册中心(如Kubernetes的etcd或Consul)获取服务和实例的信息,并为Envoy生成配置,Envoy 根据 Pilot 发过来的配置里的内容,完成具体流量的转发。
-
Pilot可以被认为是团队的领袖。它负责监督和指导队伍中的每个Envoy。Pilot知道整个团队中每个服务的位置,以及它们应该如何相互协作。当有新队员加入或者队员的位置变化时,Pilot会负责通知每个队员,确保大家都知道最新的情况,不会出现迷路或者错过重要信息,会把要做的事形成文件下发到每个envoy队员里。
Envoy
-
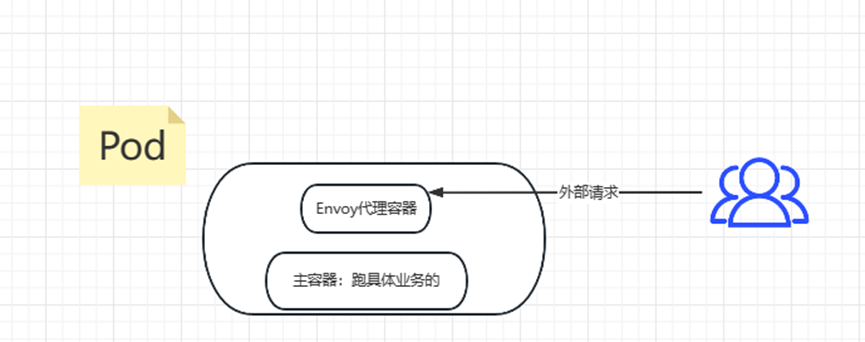
Envoy是Istio中的代理,我们如果开启了istio功能,会在pod里自动注入Envoy代理容器,它负责处理服务之间的所有网络通信,拦截并转发所有的HTTP、TCP和gRPC流量。Envoy提供强大的流量控制和管理功能,如路由、重试、超时和故障注入等。
-
Envoy和主容器同属于一个Pod,共享网络和命名空间,Envoy代理进出Pod 的流量,并将流量按照外部请求的规则作用于主容器中。
-
Envoy可以看作是服务之间的守护者。它像一个中间人一样,坐在每个服务旁边(就像每个队员身边都有一个保镖一样)。它负责处理服务之间的所有信息传递,确保信息传送得又快又准确。如果有请求从一个服务发出,Envoy会帮它找到正确的目标服务并将请求送达过去。它还能处理各种不同类型的请求,就像精通各种语言的翻译一样。
Citadel
-
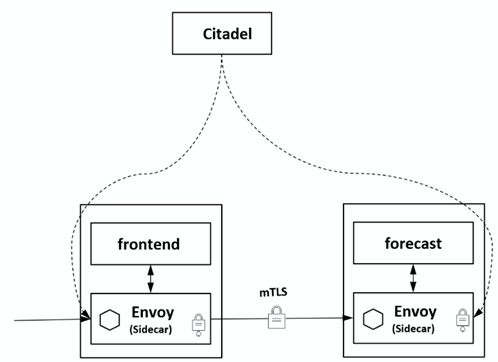
Citadel负责Istio中的身份和凭据管理,提供安全性相关的功能。它用于为服务生成和分发TLS证书,以实现服务之间的安全通信。
-
Citadel可以被视为团队中的保密专员。它负责确保团队成员之间的通信是安全的,别人无法窃听或者假冒。Citadel会为每个队员提供一个保密的通信渠道,确保他们之间的交流是私密的,就像用密码和密钥加密信息一样。
Galley
-
Galley是Istio的配置管理组件,负责验证、转换和分发配置给其他Istio组件。它监听Kubernetes的配置更改,例如Service、Deployment等,根据规则和策略生成Istio所需的配置,并将其提供给Pilot和其他组件。
-
Galley可以被看作是团队中的文件管理员。它负责管理团队中所有的文件和信息,确保每个队员都能得到正确的信息和文件。当有新的文件产生或者文件发生变化时,Galley会及时通知团队中的每个成员,确保大家都使用的是最新的文件,不会出现信息不同步的问题。
Ingressgateway
- ingressgateway是Istio服务网格中的一个特殊网关,它作为整个网格的入口,接收外部请求,并将它们引导到内部的服务。可以将它比作一个大门保安,负责接收外部人员的访问请求,然后根据配置的规则将请求分发给网格内部的服务。
egressgateway
- egressgateway是Istio服务网格中的另一个特殊网关,它负责处理网格内部服务对外部服务的访问请求。可以将它看作是一个网格内部的出口,负责将内部服务需要访问的外部服务请求发送到外部。
组件调用关系
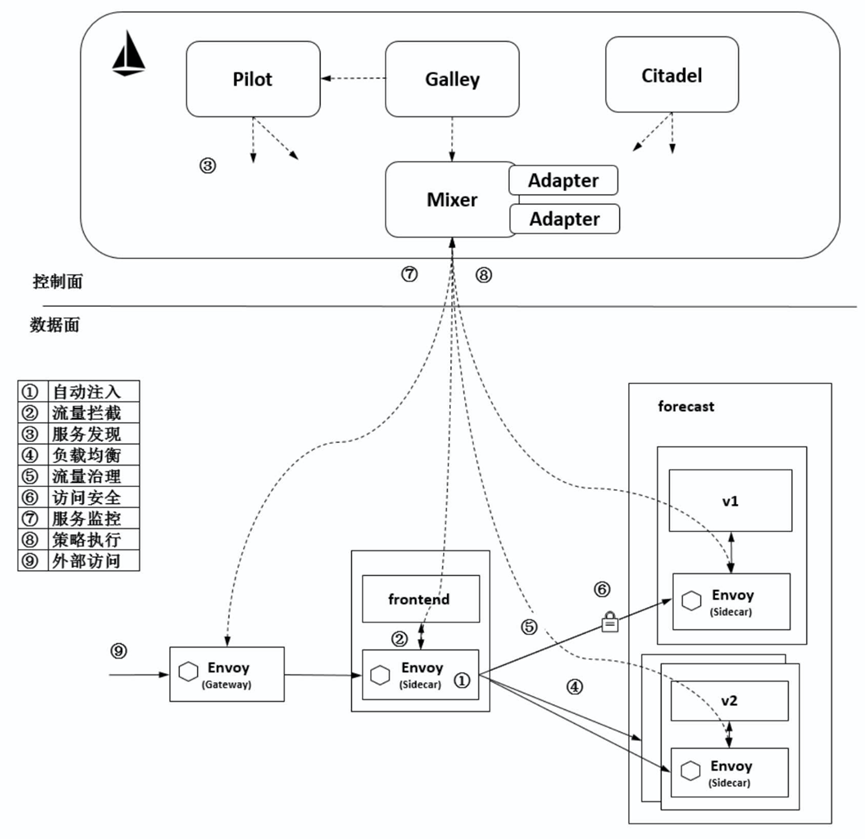
- 自动注入:Kubernetes在创建Pod时调用Sidecar代理服务,自动将Sidecar代理容器(也叫做envoy容器)注入到Pod中。
- 流量拦截:通过设置iptables规则,Envoy拦截业务容器的入口和出口流量,应用程序感知不到Sidecar代理容器的存在。上图中,流出frontend服务的流量会被 frontend服务侧的 sidecar拦截,而当流量到达forecast容器时,Inbound流量被forecast 服务侧的sidecar拦截。
- 服务发现:服务发起方的 Envoy 调用控制面组件 Pilot 的服务发现接口获取目标服务的实例列表。上图中,frontend 服务侧的 Envoy 通过 Pilot 的服务发现接口得到forecast服务各个实例的地址。
- 负载均衡:服务发起方的Envoy根据配置的负载均衡策略选择服务实例,并连接对应的实例地址。上图中,数据面的各个Envoy从Pilot中获取forecast服务的负载均衡配置,并执行负载均衡动作。
- 流量治理:Envoy 从 Pilot 中获取配置的流量规则,在拦截到 Inbound 流量和Outbound 流量时执行治理逻辑。上图中, frontend 服务侧的 Envoy 从 Pilot 中获取流量治理规则,并根据该流量治理规则将不同特征的流量分发到forecast服务的v1或v2版本。
- 访问安全:在服务间访问时通过双方的Envoy进行双向认证和通道加密,并基于服务的身份进行授权管理。上图中,Pilot下发安全相关配置,在frontend服务和forecast服务的Envoy上自动加载证书和密钥来实现双向认证,其中的证书和密钥由另一个管理面组件 Citadel维护。
- 服务监测:在服务间通信时,通信双方的Envoy都会连接管理面组件Mixer上报访问数据,并通过Mixer将数据转发给对应的监控后端。上图中,frontend服务对forecast服务的访问监控指标、日志和调用链都可以通过这种方式收集到对应的监控后端。
- 策略执行:在进行服务访问时,通过Mixer连接后端服务来控制服务间的访问,判断对访问是放行还是拒绝。上图中,Mixer 后端可以对接一个限流服务对从frontend服务到forecast服务的访问进行速率控制等操作。
- 外部访问:在网格的入口处有一个Envoy扮演入口网关的角 色。上图中,外部服务通过Gateway访问入口服务 frontend,对 frontend服务的负载均衡和一些流量治理策略都在这个Gateway上执行。
k8s-1.23部署istio
安装istioctl
k8s <= 1.23装istio 1.10/1.13即可;k8s >= 1.24装1.18+
#可以github拉取或者课件上传安装包istio-1.13.1.tar.gz
tar zxvf istio-1.13.1.tar.gz
cd istio-1.13.1
#samples/目录下,有示例应用程序
#bin/目录下,包含istioctl的客户端文件。istioctl工具用于手动注入Envoy sidecar代理。
#istioctl路径添加到环境变量,任何位置可以执行命令
export PATH=$PWD/bin:$PATH
#拷贝到/usr/bin
cd /root/istio/istio-1.13.1/bin/
cp -ar istioctl /usr/bin/
解压istio组件镜像
#工作节点上
docker load -i  pilot.tar.gz
docker load -i  proxyv2.tar.gz
docker load -i  httpbin.tar.gz
安装istio
istioctl install --set profile=demo -y
kubectl get pods -n istio-system
#卸载istio
istioctl manifest generate --set profile=demo | kubectl delete -f -
istioctl x uninstall --purge
- demo模式安装完成后,创建了3个pod:

Profile说明
-
使用
istioctl install --set profile=demo安装 Istio 时,会根据指定的 profile 来选择使用的 Istio 配置文件。profile 参数是一个预定义的配置选项,用于快速设置 Istio 的安装配置。每个 profile 都对应一个特定的 YAML 配置文件,其中包含了一组预定义的配置选项。 -
在 Istio 的安装过程中,profile 参数可以指定为以下一些值:
-
demo:适用于生产环境,包含
istiod、ingressgateway、egressgateway -
default:这是一个最小配置,仅包含最基本的组件,如
istiod和ingressgateway -
minimal:这个配置相对更加精简,只包含了必需的组件,适用于资源受限或轻量级的环境。只会安装
istiod。 -
istioctl install 本质上是根据选择的 profile 来加载对应的 YAML 配置文件,并将配置部署到 Kubernetes 集群中。
-
如果你想查看 demo 配置文件的内容,可以通过以下命令查找 Istio 的安装目录并找到对应的文件:
istioctl profile dump demo
这将打印出 demo 配置的完整内容,包括各个组件的配置选项。你也可以在 Istio 官方文档中找到各种预定义的 profile 配置选项的详细信息。
示例-istio代理在线书店微服务项目
功能介绍
-
这个bookinfo项目是istio官网自带的示例应用:Istio / Bookinfo Application
-
该应用由四个单独的微服务构成,这个应用模仿在线书店的一个分类,显示一本书的信息,页面上会显示一本书的描述,书籍的细节(ISBN、页数等),以及关于这本书的一些评论。
-
Bookinfo应用分为四个单独的微服务
1)productpage这个微服务会调用details和reviews两个微服务,用来生成页面;
2)details这个微服务中包含了书籍的信息;
3)reviews这个微服务中包含了书籍相关的评论,它还会调用ratings微服务;
4)ratings这个微服务中包含了由书籍评价组成的评级信息。
- reviews微服务有3个版本
1)v1版本不会调用ratings服务;
2)v2版本会调用ratings服务,并使用1到5个黑色星形图标来显示评分信息;
3)v3版本会调用ratings服务,并使用1到5个红色星形图标来显示评分信息。
架构介绍
-
不使用istio代理
-
Bookinfo应用中的几个微服务是由不同的语言编写的。这些服务对istio并无依赖,但是构成了一个有代表性的服务网格的例子:它由多个服务、多个语言构成,并且reviews服务具有多个版本。
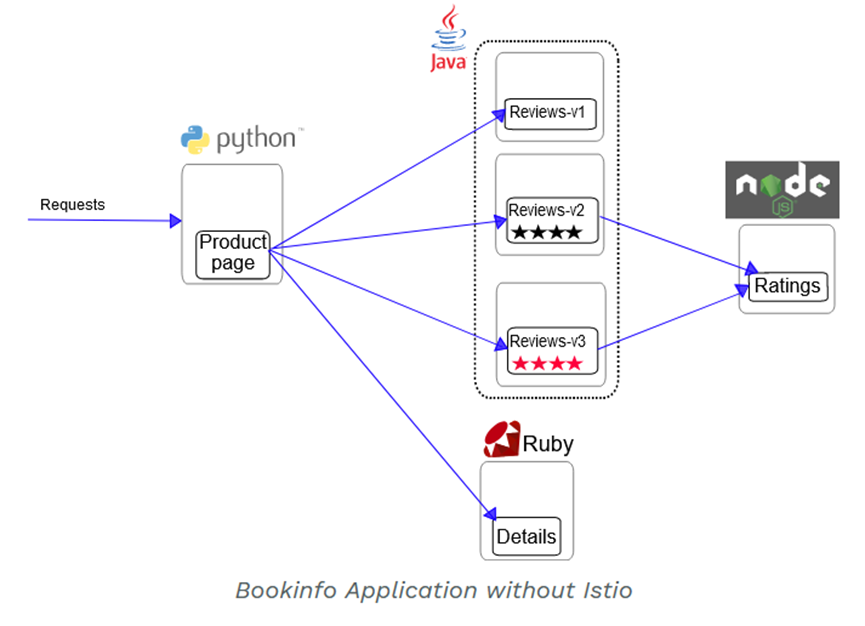
-
使用istio代理
-
要在Istio中运行这一应用,无需对应用自身做出任何改变。只要简单的在 Istio 环境中对服务进行配置和运行,具体一点说就是把 Envoy sidecar 注入到每个服务之中。 最终的部署结果将如下图所示:
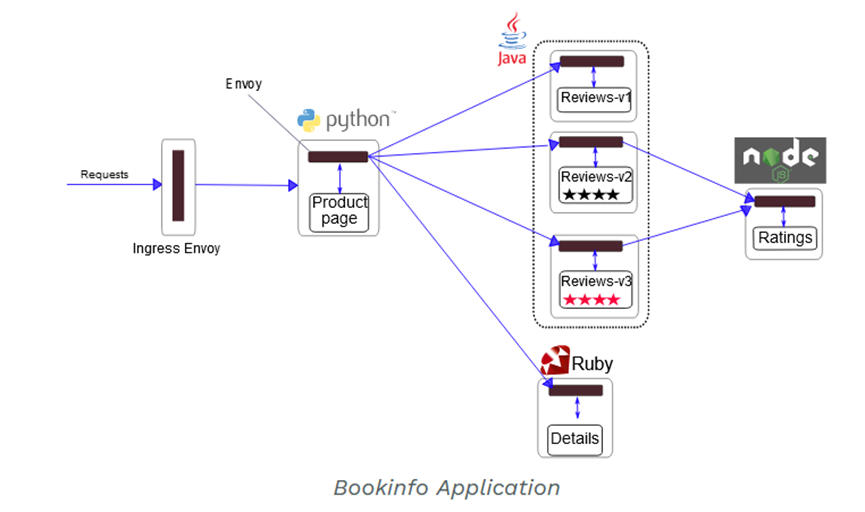
- 所有的微服务都和Envoy sidecar集成在一起,被集成服务所有的出入流量都被envoy sidecar 所劫持,这样就为外部控制准备了所需的 Hook,然后就可以利用Istio控制平面为应用提供服务路由、遥测数据收集以及策略实施等功能。
启动应用
- istio默认自动注入 sidecar,需要为default命名空间打上标签
istio-injection=enabled
kubectl label namespace default istio-injection=enabled
- 解压bookinfo镜像
docker load -i  examples-bookinfo-details.tar.gz
docker load -i  examples-bookinfo-reviews-v1.tar.gz
docker load -i  examples-bookinfo-productpage.tar.gz
#注:这里解压出来的product page image版本是1.16.2,而非1.15.
docker load -i  examples-bookinfo-reviews-v2.tar.gz
docker load -i  examples-bookinfo-ratings.tar.gz
docker load -i  examples-bookinfo-reviews-v3.tar.gz
- 部署bookinfo pod
cd /root/istio/istio-1.13.1/samples/bookinfo/platform/kube
kubectl apply -f bookinfo.yaml #bookinfo的部署yaml文件
# Copyright Istio Authors
#
#   Licensed under the Apache License, Version 2.0 (the "License");
#   you may not use this file except in compliance with the License.
#   You may obtain a copy of the License at
#
#       http://www.apache.org/licenses/LICENSE-2.0
#
#   Unless required by applicable law or agreed to in writing, software
#   distributed under the License is distributed on an "AS IS" BASIS,
#   WITHOUT WARRANTIES OR CONDITIONS OF ANY KIND, either express or implied.
#   See the License for the specific language governing permissions and
#   limitations under the License.

##################################################################################################
# This file defines the services, service accounts, and deployments for the Bookinfo sample.
#
# To apply all 4 Bookinfo services, their corresponding service accounts, and deployments:
#
#   kubectl apply -f samples/bookinfo/platform/kube/bookinfo.yaml
#
# Alternatively, you can deploy any resource separately:
#
#   kubectl apply -f samples/bookinfo/platform/kube/bookinfo.yaml -l service=reviews # reviews Service
#   kubectl apply -f samples/bookinfo/platform/kube/bookinfo.yaml -l account=reviews # reviews ServiceAccount
#   kubectl apply -f samples/bookinfo/platform/kube/bookinfo.yaml -l app=reviews,version=v3 # reviews-v3 Deployment
##################################################################################################

##################################################################################################
# Details service
##################################################################################################
apiVersion: v1
kind: Service
metadata:
  name: details
  labels:
    app: details
    service: details
spec:
  ports:
  - port: 9080
    name: http
  selector:
    app: details
---
apiVersion: v1
kind: ServiceAccount
metadata:
  name: bookinfo-details
  labels:
    account: details
---
apiVersion: apps/v1
kind: Deployment
metadata:
  name: details-v1
  labels:
    app: details
    version: v1
spec:
  replicas: 1
  selector:
    matchLabels:
      app: details
      version: v1
  template:
    metadata:
      labels:
        app: details
        version: v1
    spec:
      serviceAccountName: bookinfo-details
      containers:
      - name: details
        image: istio/examples-bookinfo-details-v1:1.15.0
        imagePullPolicy: IfNotPresent
        ports:
        - containerPort: 9080
        securityContext:
          runAsUser: 1000
          #当容器运行时,它的进程将以用户 ID 1000 运行。这是一种安全措施,可以防止容器以 root 用户(用户 ID 为 0)运行,因为 root 用户具有全部权限,如果容器被攻击,攻击者可能会获得对整个系统的控制权。
---
##################################################################################################
# Ratings service
##################################################################################################
apiVersion: v1
kind: Service
metadata:
  name: ratings
  labels:
    app: ratings
    service: ratings
spec:
  ports:
  - port: 9080
    name: http
  selector:
    app: ratings
---
apiVersion: v1
kind: ServiceAccount
metadata:
  name: bookinfo-ratings
  labels:
    account: ratings
---
apiVersion: apps/v1
kind: Deployment
metadata:
  name: ratings-v1
  labels:
    app: ratings
    version: v1
spec:
  replicas: 1
  selector:
    matchLabels:
      app: ratings
      version: v1
  template:
    metadata:
      labels:
        app: ratings
        version: v1
    spec:
      serviceAccountName: bookinfo-ratings
      containers:
      - name: ratings
        image: istio/examples-bookinfo-ratings-v1:1.15.0
        imagePullPolicy: IfNotPresent
        ports:
        - containerPort: 9080
        securityContext:
          runAsUser: 1000
---
##################################################################################################
# Reviews service
##################################################################################################
apiVersion: v1
kind: Service
metadata:
  name: reviews
  labels:
    app: reviews
    service: reviews
spec:
  ports:
  - port: 9080
    name: http
  selector:
    app: reviews
---
apiVersion: v1
kind: ServiceAccount
metadata:
  name: bookinfo-reviews
  labels:
    account: reviews
---
apiVersion: apps/v1
kind: Deployment
metadata:
  name: reviews-v1
  labels:
    app: reviews
    version: v1
spec:
  replicas: 1
  selector:
    matchLabels:
      app: reviews
      version: v1
  template:
    metadata:
      labels:
        app: reviews
        version: v1
    spec:
      serviceAccountName: bookinfo-reviews
      containers:
      - name: reviews
        image: istio/examples-bookinfo-reviews-v1:1.15.0
        imagePullPolicy: IfNotPresent
        env:
        - name: LOG_DIR
          value: "/tmp/logs"
        ports:
        - containerPort: 9080
        volumeMounts:
        - name: tmp
          mountPath: /tmp
        - name: wlp-output
          mountPath: /opt/ibm/wlp/output
        securityContext:
          runAsUser: 1000
      volumes:
      - name: wlp-output
        emptyDir: {}
      - name: tmp
        emptyDir: {}
---
apiVersion: apps/v1
kind: Deployment
metadata:
  name: reviews-v2
  labels:
    app: reviews
    version: v2
spec:
  replicas: 1
  selector:
    matchLabels:
      app: reviews
      version: v2
  template:
    metadata:
      labels:
        app: reviews
        version: v2
    spec:
      serviceAccountName: bookinfo-reviews
      containers:
      - name: reviews
        image: istio/examples-bookinfo-reviews-v2:1.15.0
        imagePullPolicy: IfNotPresent
        env:
        - name: LOG_DIR
          value: "/tmp/logs"
        ports:
        - containerPort: 9080
        volumeMounts:
        - name: tmp
          mountPath: /tmp
        - name: wlp-output
          mountPath: /opt/ibm/wlp/output
        securityContext:
          runAsUser: 1000
      volumes:
      - name: wlp-output
        emptyDir: {}
      - name: tmp
        emptyDir: {}
---
apiVersion: apps/v1
kind: Deployment
metadata:
  name: reviews-v3
  labels:
    app: reviews
    version: v3
spec:
  replicas: 1
  selector:
    matchLabels:
      app: reviews
      version: v3
  template:
    metadata:
      labels:
        app: reviews
        version: v3
    spec:
      serviceAccountName: bookinfo-reviews
      containers:
      - name: reviews
        image: istio/examples-bookinfo-reviews-v3:1.15.0
        imagePullPolicy: IfNotPresent
        env:
        - name: LOG_DIR
          value: "/tmp/logs"
        ports:
        - containerPort: 9080
        volumeMounts:
        - name: tmp
          mountPath: /tmp
        - name: wlp-output
          mountPath: /opt/ibm/wlp/output
        securityContext:
          runAsUser: 1000
      volumes:
      - name: wlp-output
        emptyDir: {}
      - name: tmp
        emptyDir: {}
---
##################################################################################################
# Productpage services
##################################################################################################
apiVersion: v1
kind: Service
metadata:
  name: productpage
  labels:
    app: productpage
    service: productpage
spec:
  ports:
  - port: 9080
    name: http
  selector:
    app: productpage
---
apiVersion: v1
kind: ServiceAccount
metadata:
  name: bookinfo-productpage
  labels:
    account: productpage
---
apiVersion: apps/v1
kind: Deployment
metadata:
  name: productpage-v1
  labels:
    app: productpage
    version: v1
spec:
  replicas: 1
  selector:
    matchLabels:
      app: productpage
      version: v1
  template:
    metadata:
      labels:
        app: productpage
        version: v1
    spec:
      serviceAccountName: bookinfo-productpage
      containers:
      - name: productpage
        image: istio/examples-bookinfo-productpage-v1:1.16.2
        #image改成1.16.2来跑,与提前解压出来的版本一致,否则按1.15版本的pod跑不起来
        imagePullPolicy: IfNotPresent
        ports:
        - containerPort: 9080
        volumeMounts:
        - name: tmp
          mountPath: /tmp
        securityContext:
          runAsUser: 1000
      volumes:
      - name: tmp
        emptyDir: {}
---
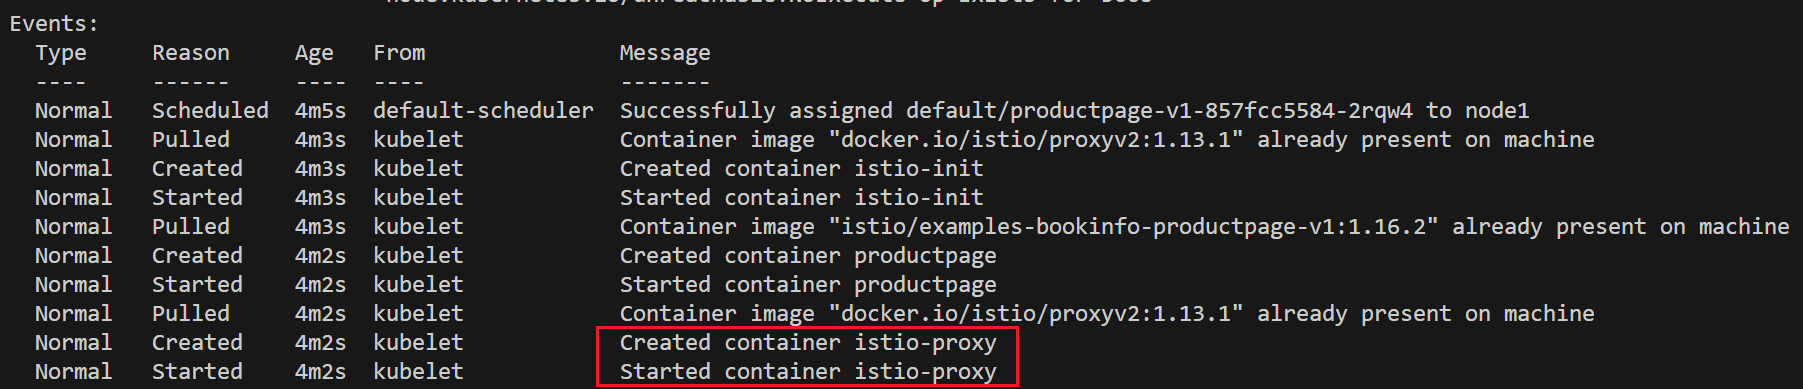
- 可以看到istio自动注入了一个istio-proxy容器
创建网关和虚拟服务
- 目的是将流量代理给istio ingressgateway
cd /root/istio/istio-1.13.1/samples/bookinfo/networking
cat bookinfo-gateway.yaml
k apply -f bookinfo-gateway.yaml
apiVersion: networking.istio.io/v1alpha3
kind: Gateway #gateway是istio自定义的资源
metadata:
  name: bookinfo-gateway
spec:
  selector:
    istio: ingressgateway # use istio default controller #代理给了istio-ingressgateway pod
  servers:
  - port:
      number: 80
      name: http
      protocol: HTTP
    hosts:
    - "*"
---
apiVersion: networking.istio.io/v1alpha3
kind: VirtualService #virtualservice是istio自定义的资源
metadata:
  name: bookinfo
spec:
  hosts:
  - "*"
  gateways:
  - bookinfo-gateway
  http:
  - match:
    - uri:
        exact: /productpage
    - uri:
        prefix: /static
    - uri:
        exact: /login
    - uri:
        exact: /logout
    - uri:
        prefix: /api/v1/products
    route:
    - destination:
        host: productpage
        port:
          number: 9080
访问bookinfo项目
- 项目入口是在istio-ingressgateway的pod,想访问这个pod就需要访问这个pod前端的四层代理svc
#查看ingressgateway pod
k get po -n istio-system -owide

istio-ingressgateway-569d7bfb4-ksqpk   1/1     Running   0          6h57m   10.244.166.170   node1   <none>           <none>
#查看svc
k get svc -n istio-system

istio-ingressgateway   LoadBalancer   10.104.98.112   <pending>     15021:30302/TCP,80:30191/TCP,443:30749/TCP,31400:31480/TCP,15443:30944/TCP   6h50m
#svc的80端口对应物理机的30191端口,查看ipvs规则看30191端口对应哪个网卡
ipvsadm -Ln
TCP  192.168.40.180:30191 rr
  -> 10.244.166.170:8080
# 即访问192.168.40.180:30191可以将请求代理给istio-ingressgateway pod(暴露8080端口),路由写/productpage,则由virtualservice代理给productpage的后端pod
# (访问任一k8s节点IP:30191端口都可以将请求代理过去)
# 代理流程:http://192.168.40.180:30191/productpage -> istio-ingressgateway pod 10.244.166.170:8080 -> productpage的svc -> productpage的pod
- 浏览器访问http://192.168.40.180:30191/productpage,刷新后会看到ratings界面的星星变化,因为ratings svc代理流量是到3个版本的ratings pod上
示例-通过istio实现金丝雀发布
金丝雀发布
- 灰度发布也叫金丝雀部署,是指通过控制流量的比例,实现新老版本的逐步更替。
-
比如对于服务A 有 version1、version2 两个版本,当前两个版本同时部署,访问version1比例90%,访问version2比例10%;看运行效果,如果效果好逐步调整流量占比 80~20,70~30,10~90,0~100,最终version1版本下线。
-
灰度发布的特点:
- 新老版本共存
- 可以实时根据反馈动态调整占比
- 理论上不存在服务完全宕机的情况
- 适合于服务的平滑升级与动态更新
准备镜像
#准备镜像,上传canary-v1.tar.gz,canary-v2.tar.gz,并在工作节点解压
docker load -i canary-v1.tar.gz
docker load -i canary-v2.tar.gz
准备yaml文件
- 准备v1版本的应用
apiVersion: apps/v1
kind: Deployment
metadata:
  name: appv1
  labels:
    app: v1
spec:
  replicas: 1
  selector:
    matchLabels:
      app: v1
      apply: canary
  template:
    metadata:
      labels:
        app: v1
        apply: canary
    spec:
      containers:
      - name: nginx
        image: xianchao/canary:v1
        ports:
        - containerPort: 80
- 准备v2版本的应用
apiVersion: apps/v1
kind: Deployment
metadata:
  name: appv1
  labels:
    app: v2
spec:
  replicas: 1
  selector:
    matchLabels:
      app: v2
      apply: canary
  template:
    metadata:
      labels:
        app: v2
        apply: canary
    spec:
      containers:
      - name: nginx
        image: xianchao/canary:v2
        ports:
        - containerPort: 80
创建svc、gateway代理流量
- 创建svc
apiVersion: v1
kind: Service
metadata:
  name: canary
  labels:
    apply: canary
spec:
  selector:
    apply: canary
  ports:
    - protocol: TCP
      port: 80
      targetPort: 80
此时有两个版本的pod都是apply: canary标签,这个svc代理了两个pod,默认是采用轮询方式,curl svc-ip时会轮流代理给v1和v2两个pod
- 创建gateway
apiVersion: networking.istio.io/v1beta1
kind: Gateway
metadata:
  name: canary-gateway
spec:
  selector:
    istio: ingressgateway #去找istio-ingressgateway pod
  servers:
  - port:
      number: 80
      name: http
      protocol: HTTP #通过http访问80端口的流量会交给istio的ingress gateway
    hosts:
    - "*"
- 创建virtualservice
apiVersion: networking.istio.io/v1beta1
kind: VirtualService
metadata:
  name: canary
spec:
  hosts:
  - "*"
  gateways:
  - canary-gateway
  http:
  - route:
    - destination: #destination需要额外定义subset
        host: canary.default.svc.cluster.local
        subset: v1
      weight: 90
    - destination:
        host: canary.default.svc.cluster.local
        subset: v2
      weight: 10
---
apiVersion: networking.istio.io/v1beta1
kind: DestinationRule
metadata:
  name: canary
spec:
  host: canary.default.svc.cluster.local
  subsets: #通过subsets里面定义标签,区分出来了两个版本的应用
  - name: v1
    labels:
      app: v1
  - name: v2
    labels:
      app: v2
- 获取ingressgateway svc的port,验证金丝雀发布结果
k get svc -n istio-system
istio-ingressgateway   LoadBalancer   10.104.98.112   <pending>     15021:30302/TCP,80:30191/TCP,443:30749/TCP,31400:31480/TCP,15443:30944/TCP   10h
for i in {1..100}; do curl 192.168.40.180:30191;done > 1.txt
#for i in `seq 1 100`; do curl 192.168.40.180:30463;done > 1.txt
- 后续调整流量比例,修改virtualservice的权重即可
示例-istio实现熔断
准备镜像
- 课件中的httpbin.tar.gz,上传到工作节点docker load -i解压
部署httpbin
cd /root/istio/istio-1.13.1/samples/httpbin/
kubectl apply -f httpbin.yaml
# Copyright Istio Authors
#
#   Licensed under the Apache License, Version 2.0 (the "License");
#   you may not use this file except in compliance with the License.
#   You may obtain a copy of the License at
#
#       http://www.apache.org/licenses/LICENSE-2.0
#
#   Unless required by applicable law or agreed to in writing, software
#   distributed under the License is distributed on an "AS IS" BASIS,
#   WITHOUT WARRANTIES OR CONDITIONS OF ANY KIND, either express or implied.
#   See the License for the specific language governing permissions and
#   limitations under the License.

##################################################################################################
# httpbin service
##################################################################################################
apiVersion: v1
kind: ServiceAccount
metadata:
  name: httpbin
---
apiVersion: v1
kind: Service
metadata:
  name: httpbin
  labels:
    app: httpbin
    service: httpbin
spec:
  ports:
  - name: http
    port: 8000
    targetPort: 80
  selector:
    app: httpbin
---
apiVersion: apps/v1
kind: Deployment
metadata:
  name: httpbin
spec:
  replicas: 1
  selector:
    matchLabels:
      app: httpbin
      version: v1
  template:
    metadata:
      labels:
        app: httpbin
        version: v1
    spec:
      serviceAccountName: httpbin
      containers:
      - image: docker.io/kennethreitz/httpbin
        imagePullPolicy: IfNotPresent
        name: httpbin
        ports:
        - containerPort: 80
配置熔断策略
- 创建一个目标规则,在调用httpbin服务时应用断路器设置
apiVersion:  networking.istio.io/v1beta1
kind: DestinationRule
metadata:
  name: httpbin
spec:
  host: httpbin #指定service名称
  trafficPolicy: #设置熔断策略
    connectionPool:
      tcp:
        maxConnections: 1 #指定每个目标服务的最大连接数限制为1。这意味着对于每个目标服务,最多只能有1个并发连接。
      http:
        http1MaxPendingRequests: 1 #每个连接最大挂起请求数
        maxRequestsPerConnection: 1  #每个连接最大发起一个请求,一个请求处理完,连接就关闭
    outlierDetection: #检测目标服务的异常情况
      consecutiveGatewayErrors: 1 #请求httpbin服务,只要返回gateway错误一次,就达到出发熔断的条件
      interval: 1s
      baseEjectionTime: 3m
      maxEjectionPercent: 100 #只要探测失败1次,就熔断,拒绝请求
创建压测客户端
- fotrio是对web服务做压测的工具
#上传镜像并解压:docker load -i fortio.tar.gz
cd /root/istio/istio-1.13.1/samples/httpbin/sample-client/
k apply -f fortio-deploy.yaml
apiVersion: v1
kind: Service
metadata:
  name: fortio
  labels:
    app: fortio
    service: fortio
spec:
  ports:
  - port: 8080
    name: http
  selector:
    app: fortio
---
apiVersion: apps/v1
kind: Deployment
metadata:
  name: fortio-deploy
spec:
  replicas: 1
  selector:
    matchLabels:
      app: fortio
  template:
    metadata:
      annotations:
        # This annotation causes Envoy to serve cluster.outbound statistics via 15000/stats
        # in addition to the stats normally served by Istio. The Circuit Breaking example task
        # gives an example of inspecting Envoy stats via proxy config.
        proxy.istio.io/config: |-
          proxyStatsMatcher:
            inclusionPrefixes:
            - "cluster.outbound"
            - "cluster_manager"
            - "listener_manager"
            - "server"
            - "cluster.xds-grpc"
      labels:
        app: fortio
    spec:
      containers:
      - name: fortio
        image: fortio/fortio:latest_release
        imagePullPolicy: IfNotPresent
        ports:
        - containerPort: 8080
          name: http-fortio
        - containerPort: 8079
          name: grpc-ping
触发熔断
#测试正常服务
kubectl exec fortio-deploy-8654b894f5-7szjh -c fortio -- /usr/bin/fortio curl http://httpbin:8000/get
#触发熔断,通过发送20个请求(-n 20)和使用两个并发连接(-c 2)来调用服务
kubectl exec -it fortio-deploy-8654b894f5-7szjh  -c fortio -- /usr/bin/fortio load  -c 2 -qps 0 -n 20 -loglevel Warning http://httpbin:8000/get
#-c 2: 指定并发连接数为 2。这表示在测试期间,将会模拟 2 个并发请求。
#-qps 0: 指定每秒请求数为 0。这表示在测试期间,将以最大速率发送请求,即不限制每秒请求数。
#-n 20: 指定总请求数为 20。这表示在测试期间,将发送总共 20 个请求
最佳实践
假设你的应用是一个 Web 服务,每个 Pod 最多支持 100 万并发请求数,并且你的 Kubernetes 集群中每个节点有 100 个 vCPU 和 100GB 内存。
-
maxConnections:
-
假设每个 Pod 最多支持 6 个 vCPU,你可以设置 maxConnections 为 80(稍微小于节点的 CPU 核心数,考虑到其他系统进程的资源使用)。
-
http1MaxPendingRequests:
-
假设你的应用在正常负载情况下,每秒请求数在 1000 到 5000 之间,你可以设置 http1MaxPendingRequests 为 500,以确保连接不会积压过多的请求。
-
maxRequestsPerConnection:
-
假设你的应用的响应时间在 10 毫秒左右,你可以设置 maxRequestsPerConnection 为 100,这样每个连接可以处理 100 个请求后再关闭。
-
可以根据之前提到的测试结果和分析,根据实际情况设置 consecutiveGatewayErrors 和 interval 等参数,以实现对代理层的熔断保护。
最终的参数设置是一个动态平衡的过程,需要结合多方面因素综合考虑。建议在测试环境中进行实际的压力测试和性能评估,以找到最优的参数配置,确保你的应用在高负载下能够稳定运行。
参数含义
-
maxConnections:TCP 连接数的最大值。它限制了单个 Pod 上的 TCP 连接数量。这个值需要根据你的 Web 服务的并发量和每个请求的连接数来确定。
-
http1MaxPendingRequests:HTTP1 的最大挂起请求数。当超过这个数值时,新的请求将被拒绝,直到有请求处理完成。这个值也要根据你的 Web 服务的并发量和 HTTP1 的特性来确定。
-
maxRequestsPerConnection:每个连接的最大请求数。当超过这个数值时,连接将被关闭,新的请求将使用新的连接。这个值可以用于限制长时间保持的连接。
-
outlierDetection:异常检测参数。这个参数用于检测异常的流量,并触发熔断机制。以下是outlierDetection 参数的两个属性:
-
consecutiveGatewayErrors:连续网关错误数。当连续出现这么多次网关错误时,熔断将会触发。
-
interval:检测的时间间隔。在这个时间间隔内进行异常检测。
示例-超时
-
生产环境中经常会碰到由于调用方等待下游的响应过长,堆积大量的请求阻塞了自身服务,造成雪崩的情况,通过超时处理来避免由于无限期等待造成的故障,进而增强服务的可用性,Istio 使用虚拟服务来优雅实现超时处理。
-
下面例子模拟客户端调用 nginx,nginx 将请求转发给 tomcat。
- nginx 服务设置了超时时间为2秒,如果超出这个时间就不等待,返回超时错误。
- tomcat服务设置了响应时间延迟10秒,任何请求都需要等待10秒后才能返回。
- client 通过访问 nginx 服务去反向代理 tomcat服务,由于 tomcat服务需要10秒后才能返回,但nginx 服务只等待2秒,所以客户端会提示超时错误。
准备镜像
#busybox.tar.gz、 nginx.tar.gz、 tomcat-app.tar.gz解压
mkdir /root/timeout
cd /root/timeout/
部署应用
- nginx
apiVersion: apps/v1
kind: Deployment
metadata:
  name: nginx
  labels:
    server: nginx
    app: web
spec:
  replicas: 1
  selector:
    matchLabels:
      server: nginx
      app: web
  template:
    metadata:
      name: nginx
      labels:
        server: nginx
        app: web
    spec:
      containers:
      - name: nginx
        image: nginx:1.14-alpine
        imagePullPolicy: IfNotPresent
---
apiVersion: v1
kind: Service
metadata:
  name: nginx-svc
spec:
  selector:
    server: nginx
  ports:
  - name: http
    port: 80
    targetPort: 80
    protocol: TCP
- tomcat
apiVersion: apps/v1
kind: Deployment
metadata:
  name: tomcat
  labels:
    server: tomcat
    app: web
spec:
  replicas: 1
  selector:
    matchLabels:
      server: tomcat
      app: web
  template:
    metadata:
      name: tomcat
      labels:
        server: tomcat
        app: web
    spec:
      containers:
      - name: tomcat
        image: docker.io/kubeguide/tomcat-app:v1
        imagePullPolicy: IfNotPresent
---
apiVersion: v1
kind: Service
metadata:
  name: tomcat-svc
spec:
  selector:
    server: tomcat
  ports:
  - name: http
    port: 8080
    targetPort: 8080
    protocol: TCP
配置超时
- virtual service - 定义nginx和tomcat的超时时间
apiVersion: networking.istio.io/v1beta1
kind: VirtualService
metadata:
  name: nginx-vs
spec:
  hosts:
  - nginx-svc
  http:
  - route:
    timeout: 2s #调用 nginx-svc,请求超时时间是 2s
    - destination:
        host: nginx-svc
---
apiVersion: networking.istio.io/v1beta1
kind: VirtualService
metadata:
  name: tomcat-vs
spec:
  hosts:
  - tomcat-svc
  http:
  - fault:
      delay:
        fixedDelay: 10s #每次调用 tomcat-svc,都会延迟10s才会调用
        percentage:
          value: 100
    route:
    - destination:
        host: tomcat-svc
- nginx配置,把代理后端改成tomcat
k exec -it nginx-7649c6ff85-jn4nc -c nginx -- /bin/sh
vi /etc/nginx/conf.d/default.conf
#location处修改如下,让nginx后端代理tomcat
    location / {
        #root   /usr/share/nginx/html;
        #index  index.html index.htm;
        proxy_pass http://tomcat-svc.default.svc.cluster.local:8080;
        proxy_http_version 1.1;
    }
#让配置生效
nginx -t #验证config文件语法
nginx -s reload #重启
验证超时
kubectl run busybox --image busybox:1.28 --restart=Never --rm -it busybox -- /bin/sh
#验证故障注入效果,tomcat 10s之后才有返回
time wget -q -O - http://tomcat-svc.default.svc.cluster.local:8080
#验证超时,会报gateway timeout。因为等了nginx 2s,nginx没返回,就直接报网关超时了。
time wget -q -O - http://nginx-svc.default.svc.cluster.local:80
#验证超时,每隔2秒,由于 nginx 服务的超时时间到了而 tomcat未有响应,则提示返回超时错误。
while true; do wget -q -O - http://nginx-svc.default.svc.cluster.local:80; done
示例-故障注入和重试
- Istio 重试机制就是如果调用服务失败,Envoy 代理尝试连接服务的最大次数。而默认情况下,Envoy 代理在失败后并不会尝试重新连接服务,除非我们启动 Istio 重试机制。
- 下面例子模拟客户端调用 nginx,nginx 将请求转发给 tomcat。tomcat 通过故障注入而中止对外服务,nginx 设置如果访问 tomcat 失败则会重试 3 次。
准备镜像
- 沿用超时示例中的tomcat和nginx服务
配置重试
cd /root/timeout/
kubectl delete -f virtual-tomcat.yaml
cat virtual-attempt.yaml
apiVersion: networking.istio.io/v1beta1
kind: VirtualService
metadata:
  name: nginx-vs
spec:
  hosts:
  - nginx-svc
  http:
  - route:
    - destination:
        host: nginx-svc
    retries: #调用 nginx-svc,在初始调用失败后,最多再去重试 3 次,每个重试都有 2 秒的超时,等2s失败了再重试。
      attempts: 3
      perTryTimeout: 2s
---
apiVersion: networking.istio.io/v1beta1
kind: VirtualService
metadata:
  name: tomcat-vs
spec:
  hosts:
  - tomcat-svc
  http:
  - fault:
      abort: #abort模拟tomcat服务始终不可用,该设置说明每次调用 tomcat-svc,100%都会返回503。这些是istio提供的用来测试的配置字段
        percentage:
          value: 100
        httpStatus: 503
    route:
    - destination:
        host: tomcat-svc
验证重试
kubectl run busybox --image busybox:1.28 --restart=Never --rm -it busybox -- /bin/sh
#验证重试
wget -q -O - http://nginx-svc.default.svc.cluster.local:80
#新开终端看istio envoy的log
kubectl logs -f nginx-7649c6ff85-jn4nc -c istio-proxy
关闭istio自动注入功能
#给ns把istio-injection的标签删掉即可
kubectl label ns default istio-injection-